Next.js Testing Crash Course
Loading...
Loading...

Join JS Mastery Pro to apply what you learned today through real-world builds, weekly challenges, and a community of developers working toward the same goal.
When you work on small projects or quick freelance jobs, testing usually feels like a waste of time. And yeah, for tiny apps, skipping tests doesn’t break anything. But that idea doesn’t hold up once you start working on real products with real teams.
In bigger companies, the mindset is completely different. A single component goes through planning, discussions, and review. Sometimes that one component gets more attention than the full app you built in a weekend. It feels strange at first, but that’s how real production work is done.
These teams think long term. They want stable features, smooth user experience, and code that won’t fall apart after the next update. Many even track how users interact with every part of their app. With that level of responsibility, testing isn’t an extra step, it’s part of the workflow.
Companies like Apple, Google, Meta, Netflix and many others rely on tools like React and Next.js every day. And they ship with tests. Always.
So learning how to test your React and Next.js projects gives you a real edge. In this guide, we’ll walk through the testing tools and methods you’ll use in modern web apps, especially when working with TypeScript.
And before we jump in, let’s get familiar with the tools you’ll meet along the way and what each one is good for.
There are a few different ways to test a React or NextJs app. And there’s no single tool that covers everything. Each tool shines in a specific area, so knowing what to use in which situation makes your life way easier. You’ll see the testing methods in the next block, so think of this section as your cheat sheet before we dive deeper.
Jest is the most common testing framework in the JavaScript world. It handles unit tests, simple component tests and anything that runs in a Node environment. It comes with built in features like mocking, snapshots and a clean API. If you want to test pure functions, helpers, backend logic or React components without touching the browser, Jest is a solid choice.
Vitest feels like Jest but faster and more modern. Since it’s built on top of Vite, the performance boost is noticeable. The syntax is almost identical to Jest, so switching between them is easy. If your project already uses Vite or you want super quick feedback during development, Vitest fits nicely.
Playwright is great for full browser testing. It opens a real browser, interacts with your UI, clicks buttons, fills forms and checks if everything works the way a user would. You’ll often use it for end to end tests and sometimes for larger integration tests. If you want to simulate real user behavior with strong reliability, Playwright is a must.
Cypress is another big name in browser testing. It runs tests directly inside the browser and gives you a visual interface that shows every step in real time. This makes debugging very comfortable. Many teams use Cypress for end to end testing and UI flows. It’s simple to start with and perfect for checking user journeys.
Now that you know the tools available, let’s see what types of testing exist and how you can use these tools for each.
When we talk about testing in Next.js or React.js, we’re really talking about different ways to check if your app works correctly. Each type has its own purpose, and understanding them helps you pick the right approach for each situation.
In general, testing can be thought of as three main pillars:
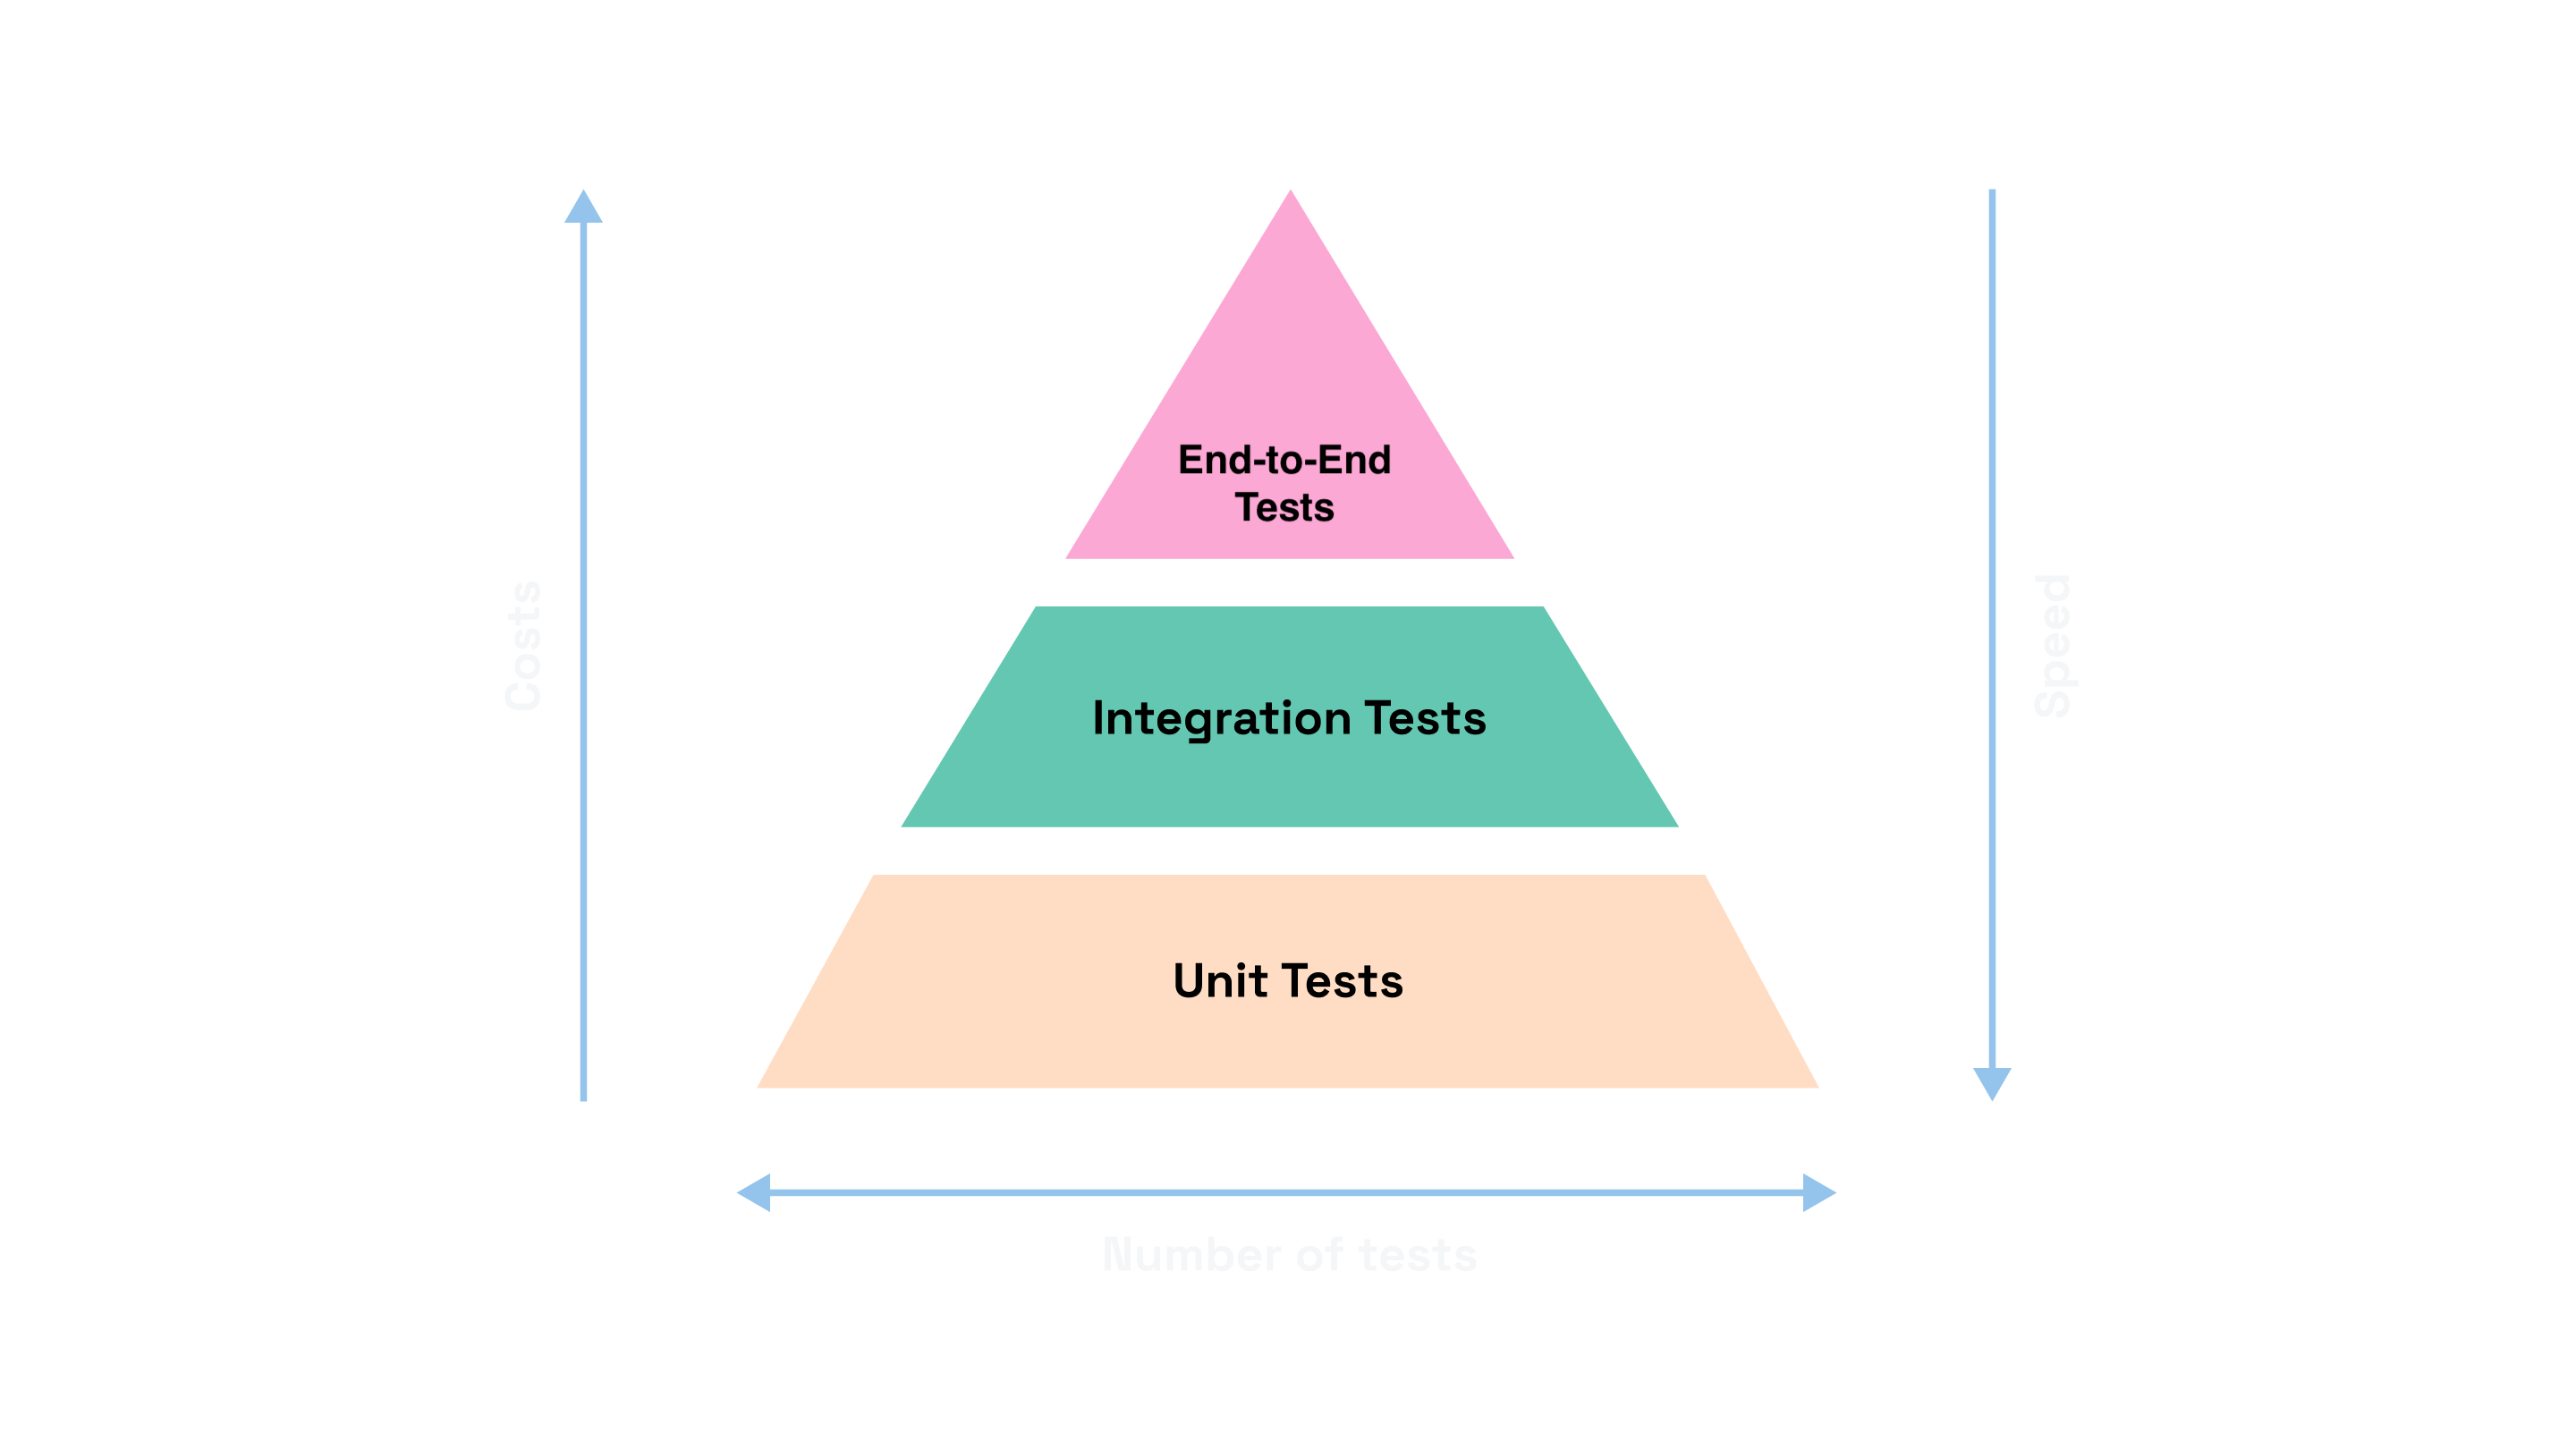
These three pillars cover the core of most testing scenarios, but there are also other types of tests, like snapshot testing or smoke/regression tests, which can be very helpful in certain situations.
Before diving into examples, let’s get familiar with these types and what each of them really does.
Unit Testing: Unit tests focus on small, individual pieces of your app, like a single component, function, or helper. For example, imagine a login page that’s made up of two separate components: a Form component and a Button component.
With unit testing, you test each of these components on their own:
Unit tests answer the question: “Does this piece work by itself?” They’re fast, give instant feedback, and form the foundation for reliable apps.
Integration Testing: After you’ve tested individual components with unit tests, the next step is to see how different parts of your app work together. This could be multiple frontend components, or a component communicating with a backend API.
For example, your Login page combines a Form and a Button. Integration testing checks whether submitting the form actually sends data to the server and handles the response correctly, or whether the components interact as expected.
Integration tests help catch issues that unit tests alone might miss, especially when pieces depend on each other.
End-to-End (E2E) Testing: E2E tests focus on the entire application from the user’s perspective. You’re checking flows, not just individual pieces:
E2E testing is slower than unit tests but ensures the app works in real-world scenarios.
Snapshot Testing: Snapshot tests take a “photo” of your UI and compare it to future versions to catch unexpected changes. For example, if you update a component layout accidentally, snapshot tests will alert you. This type of testing is lightweight but effective for spotting UI changes early.
Smoke & Regression Testing: Smoke tests are quick checks to see if the app basically works at all, while regression tests make sure old features still work after updates. They’re less common in everyday coding but very important for larger projects.
Now that you know what each type of testing does, the next step is to see some of them in action. We’ll go through brief examples of Unit, Integration, and E2E in a real Next.js application so you can understand how these type of test are actually work in an application.
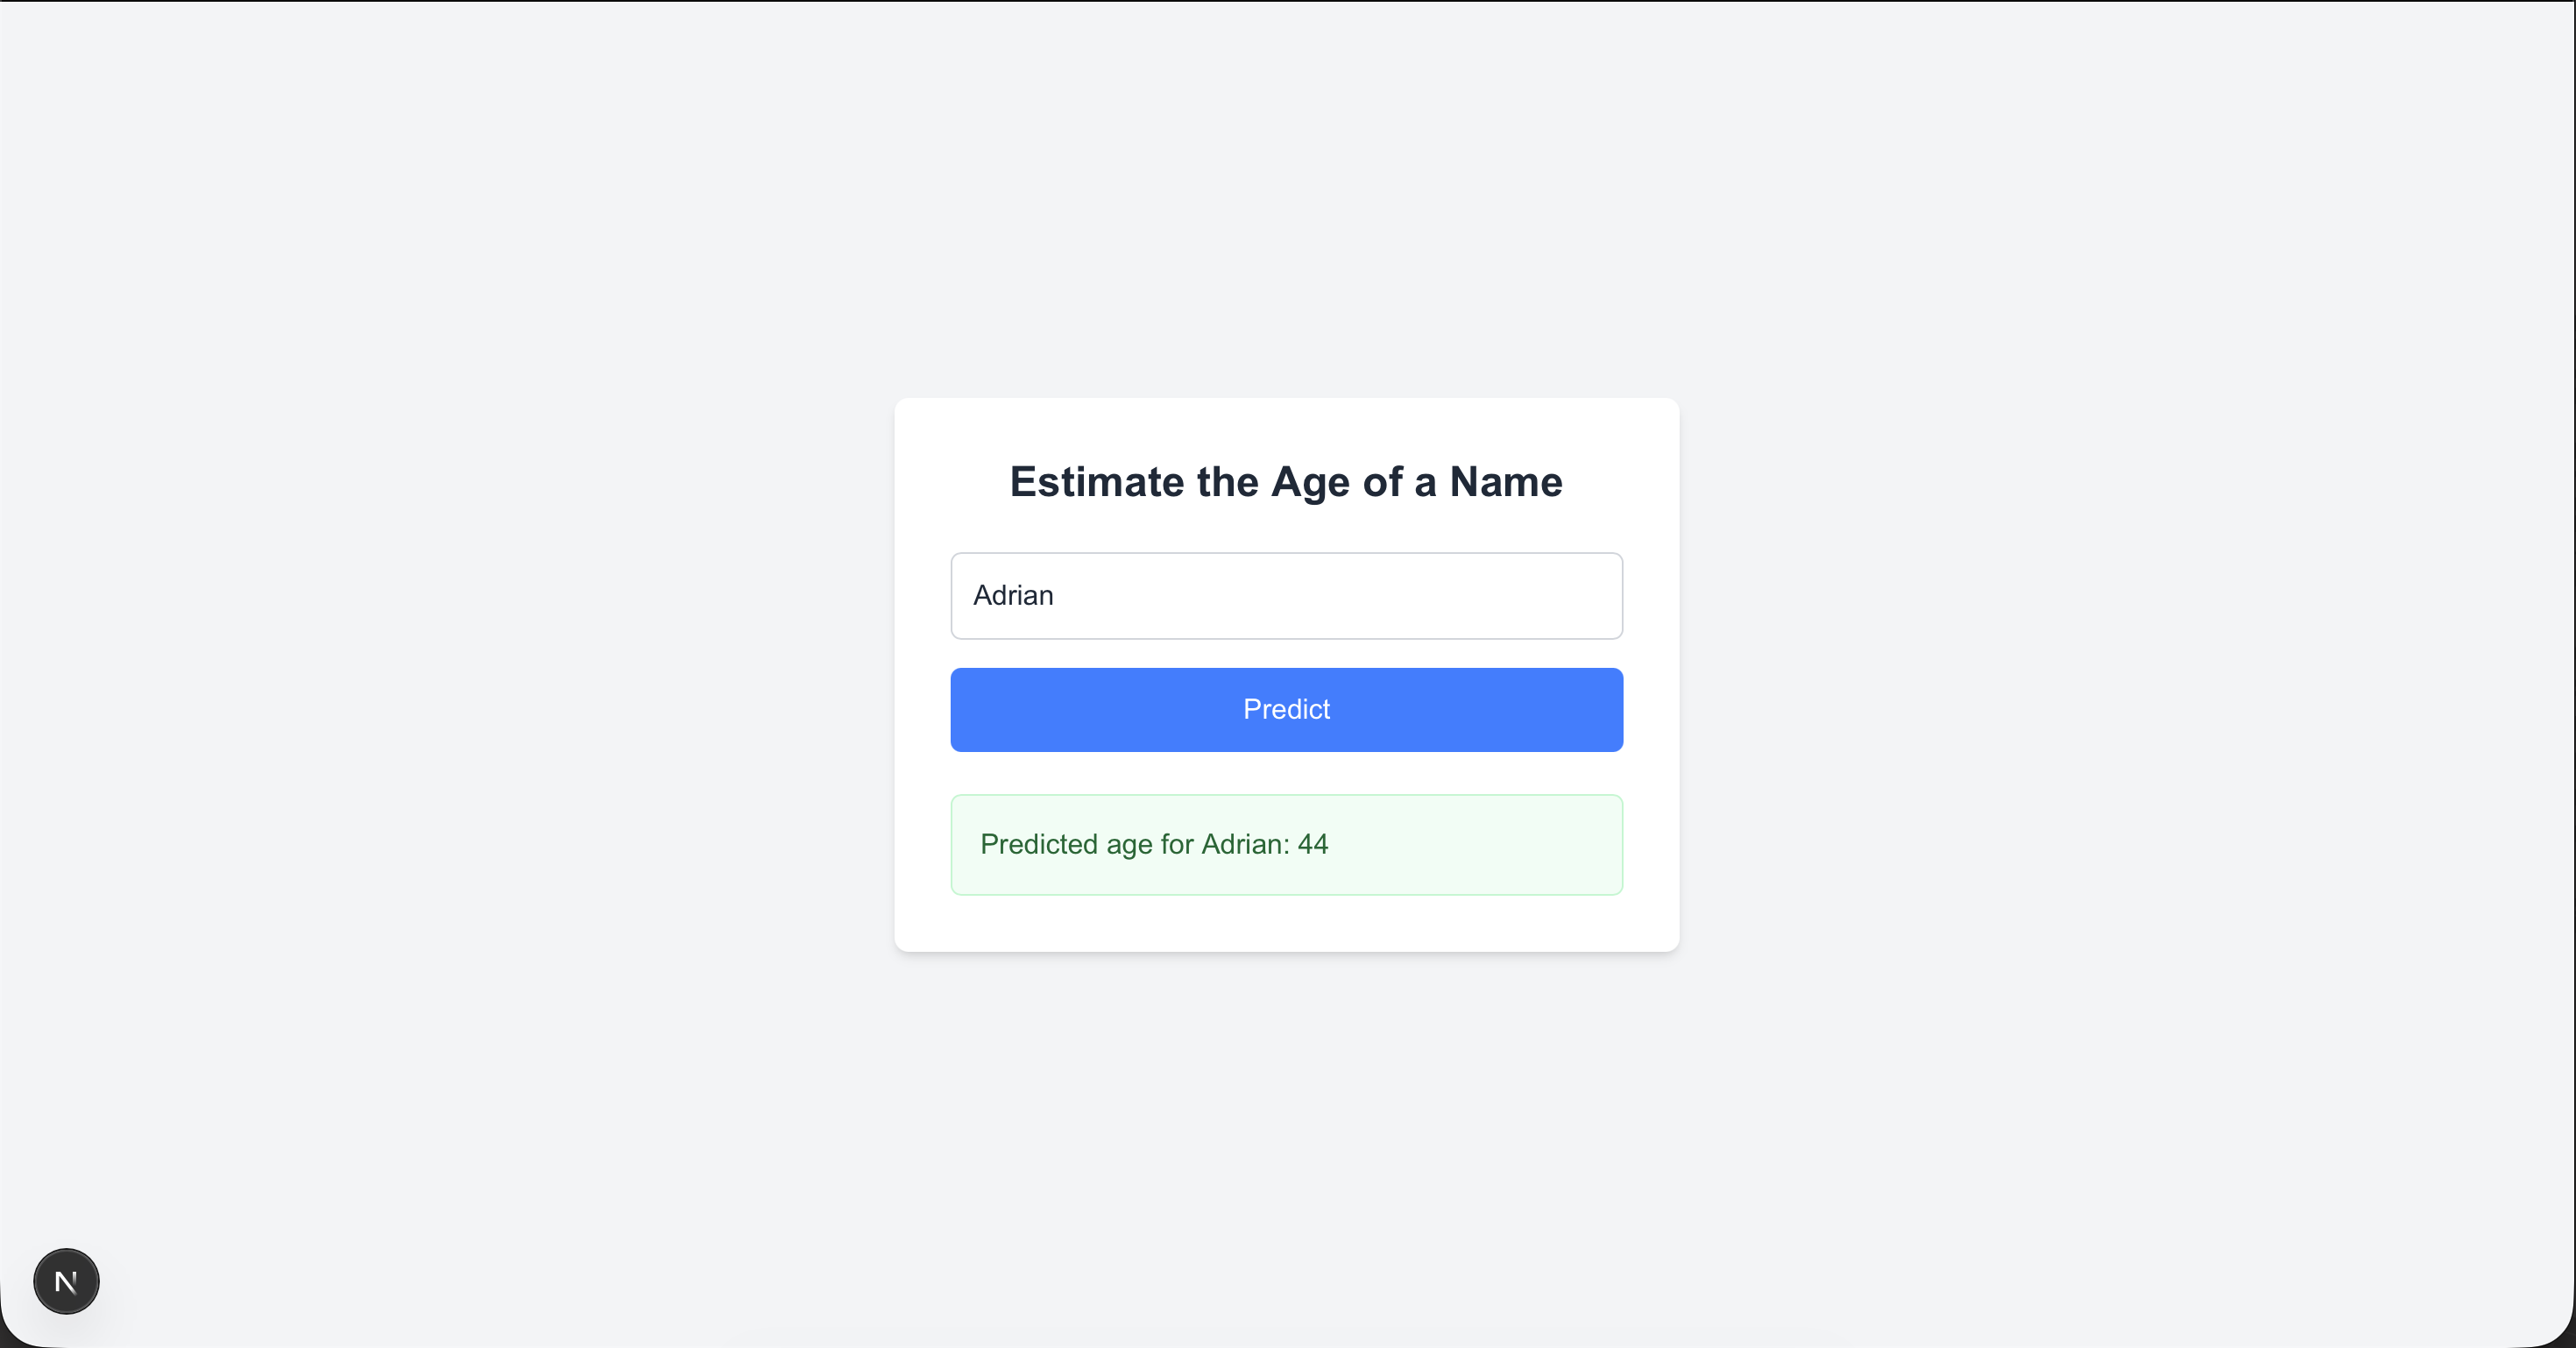
For this guide, I’ll assume you already have a fresh Next.js project. And for this tutorial I created a simple age predict application using third party api: https://agify.io/documentation. You can try it out.
And if you want to become a Next.js expert, check out our best-selling course:
In your project’s components folder, we’ll create two main components for this tutorial:
components/
├── AgePredictionResult.tsx    # Displays the predicted age
├── AgePredictorForm.tsx       # Input form to fetch age prediction
We’ll start with AgePredictionResult.tsx:
export default function AgePredictionResult({ name, age }: { name: string; age: number | null }) {
  return (
    <div className="mt-6 p-4 bg-green-50 border border-green-200 rounded-md">
      <p className="text-green-800 font-medium" data-testid="predicted-age">
        Predicted age for {name}: {age}
      </p>
    </div>
  );
}
And create a Predictor form components/AgePredictorForm.tsx :
'use client';

import { useState } from 'react';
import AgePredictionResult from './AgePredictionResult';

export default function AgePredictorForm() {
  const [name, setName] = useState('');
  const [age, setAge] = useState<number | null>(null);

  const handleFetch = async () => {
    const res = await fetch(`https://api.agify.io/?name=${name}`);
    const data = await res.json();
    setAge(data.age);
  };

  return (
    <div className="bg-white p-8 rounded-lg shadow-md max-w-md w-full">
      <h1 className="text-2xl font-bold text-gray-800 text-center mb-6 text-gray-800">Estimate the Age of a Name</h1>
      <input
        type="text"
        className="w-full p-3 border border-gray-300 rounded-md mb-4 text-gray-800 placeholder-gray-500 focus:outline-none focus:ring-2 focus:ring-blue-400"
        placeholder="Enter your name"
        value={name}
        onChange={(e) => setName(e.target.value)}
      />
      <button
        className="w-full bg-blue-500 text-white p-3 rounded-md hover:bg-blue-600 transition"
        onClick={handleFetch}
      >
        Predict
      </button>

      {age !== null && <AgePredictionResult name={name} age={age} />}
    </div>
  );
}
Now the home page component will be:
export default function Home() {
  return (
    <div className="min-h-screen bg-gray-100 flex items-center justify-center">
      <AgePredictorForm />
    </div>
  );
}
Alright, we are going to write test for this simple mini application in Unit, Integration and End-to-End test. So let’s jump right in…
We’ll use Vitest inside a Next.js project since it’s lightweight, fast, and its API feels very similar to Jest. If you’ve ever used Jest before, switching to Vitest will feel natural.
Before we start writing test files, install Vitest and a few testing utilities. These will be added as dev dependencies because they’re only needed during development.
Run this:
npm install -D vitest @vitejs/plugin-react jsdom @testing-library/react @testing-library/jest-dom @testing-library/dom vite-tsconfig-pathsAfter installing everything, here’s a quick look at what each package does:
Now let’s get the basic testing structure in place. Inside your project, create a new tests folder, and inside it create a unitfolder where all your unit tests will live:
tests
└── unit
Next, in the root of your project, create a vitest.setup.ts file. This file runs before your tests and lets you set up anything your tests need globally.
Add this inside:
// vitest.setup.ts

import '@testing-library/jest-dom';
This brings in the jest-dom assertion library that we installed earlier, which adds helpful matchers. It’s originally designed for Jest, but its matchers also work with Vitest thanks to its Jest compatibility.
Next, create a vitest.config.ts in the root and drop in this config:
// vitest.config.ts

import { defineConfig } from 'vitest/config';
import react from '@vitejs/plugin-react';
import tsconfigPaths from 'vite-tsconfig-paths';

export default defineConfig({
  plugins: [tsconfigPaths(), react()],
  test: {
    environment: 'jsdom',
    globals: true,
    setupFiles: ['./vitest.setup.ts'],
    include: ['./tests/unit/**/*.test.{ts,tsx}'],
    reporters: 'verbose',
  },
});
Here’s what’s happening:
Now first, we will write unit test for our AgePredictionResult component. Inside tests/unit, create a file called agePredictionResult.test.tsx :
tests
└── unit
└── agePredictionResult.test.tsxFor this component, we will write two main unit tests:
Each test focuses on one isolated behavior, which is the essence of unit testing.
import { describe, it, expect } from 'vitest';

import AgePredictionResult from '@/components/AgePredictionResult';

describe('AgePredictionResult component - Unit Test', () => {
  it('displays the predicted age correctly', () => {
    render(<AgePredictionResult name="Alice" age={25} />);
    const resultText = screen.getByText('Predicted age for Alice: 25');
    expect(resultText).toBeInTheDocument();
  });

  it('handles null age gracefully', () => {
    render(<AgePredictionResult name="Bob" age={null} />);
    const resultText = screen.getByText('Predicted age for Bob:');
    expect(resultText).toBeInTheDocument();
  });
});
A quick breakdown of what’s happening here:
This is the core idea behind unit testing a component, test a single piece in isolation and make sure every small behavior works exactly as expected.
To run your tests easily, add a test script to your package.json:
"scripts": {
    "dev": "next dev",
    "build": "next build",
    "start": "next start",
    "test": "vitest", // 👈 add the vitest test command to run.
  },
Now run your first test:
npm run testYou should see something like this once it passes:
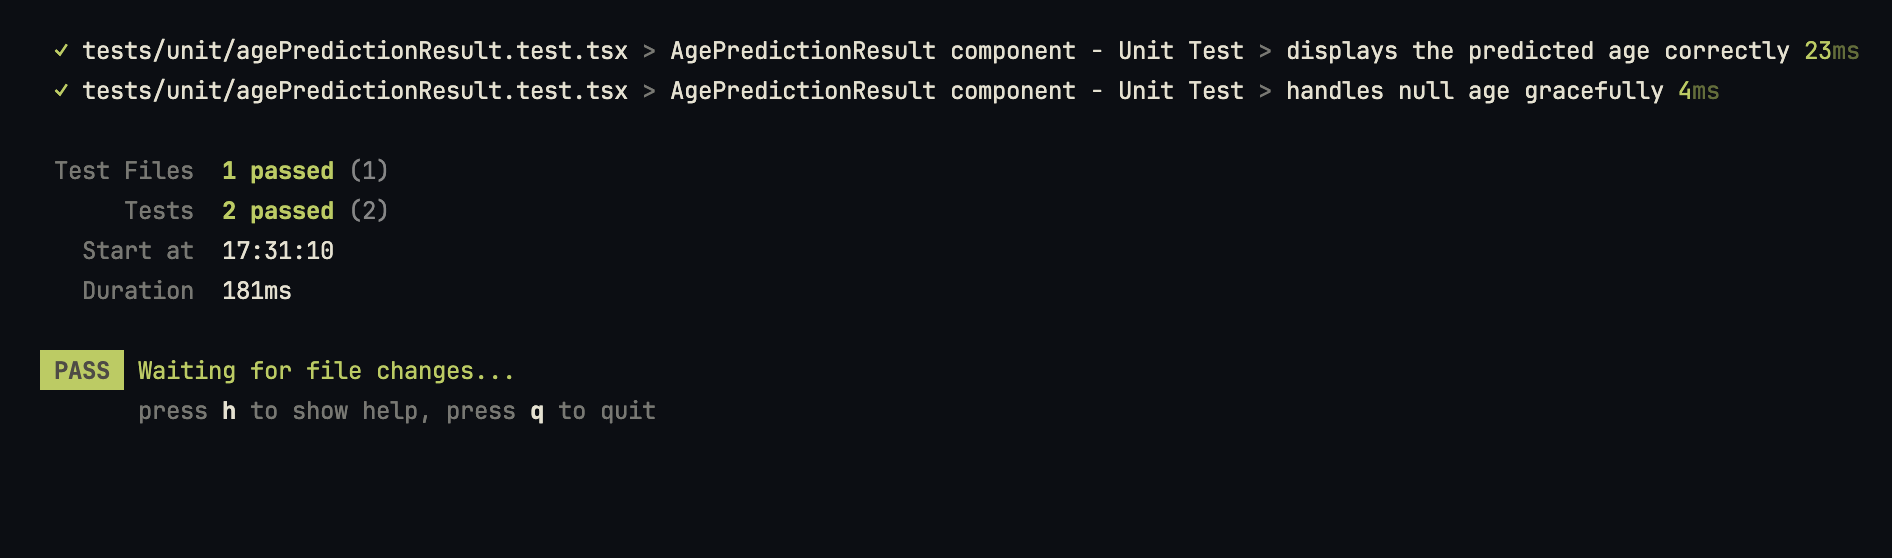
And that’s it! You just wrote your first unit test for a Next.js component. Along the way, you learned how to:
Next, we’ll move on to the AgePredictorForm component. This one is a bit more interesting because it fetches data from an API and also uses the AgePredictionResult component. Since multiple pieces are working together, this is a perfect case for integration testing, where we check that everything interacts correctly.
For integration testing, we can stick with Vitest and the same testing libraries we’ve already installed, no extra setup is needed.
A quick note: integration testing can be tricky because it can cover different things, server integration, API integration, or multiple components working together. In this example, we’ll focus on a component-level integration test using our AgePredictorForm component.
If you want to dive deeper and learn how to write production-ready tests for a Next.js application, check out our full course:
For this form, we will write two integration tests:
These tests focus on the full interaction flow, not isolated pieces.
Now create the test file at:
tests
└── integration
    └── agePredictorForm.test.tsx
And add the following code:
import { describe, it, expect, vi } from 'vitest';

import AgePredictorForm from '@/components/AgePredictorForm';

// Mock fetch globally so we can control the API response
global.fetch = vi.fn();

describe('AgePredictorForm', () => {
  it('updates the input value', () => {
    render(<AgePredictorForm />);
    const input = screen.getByPlaceholderText('Enter your name');
    fireEvent.change(input, { target: { value: 'Alice' } });
    expect(input).toHaveValue('Alice');
  });

  it('displays predicted age after fetching', async () => {
    (global.fetch as any).mockResolvedValueOnce({
      json: () => Promise.resolve({ age: 25 }),
    });

    render(<AgePredictorForm />);
    const input = screen.getByPlaceholderText('Enter your name');
    const button = screen.getByText('Predict');

    fireEvent.change(input, { target: { value: 'Alice' } });
    fireEvent.click(button);

    const result = await screen.findByText('Predicted age for Alice: 25');
    expect(result).toBeInTheDocument();
    expect(global.fetch).toHaveBeenCalledWith('https://api.agify.io/?name=Alice');
  });
});
A quick breakdown of what’s happening here:
So far, we’ve tested both components and covered unit and integration scenarios. Now it’s time to look at everything from the user’s perspective. To understand the real experience, we’ll write an end to end test, where we load the actual app, interact with it like a real user, and verify the full flow.
Let’s walk through how to write an E2E test in a Next.js project.
For E2E tests we’ll use Playwright. It runs real browsers, interacts with your app like a user, and gives great debugging tools (screenshots, traces, HTML reports).
Now, run the command to install Playwright:
npm init playwrightIt will show a couple of prompts. For a step-by-step guide, check the Playwright Installation Doc.
Next, we’ll configure the playwright.config.ts file. Playwright usually creates it automatically, but if it didn’t, just create one and paste the following:
export default defineConfig({
  testDir: './tests/e2e',
  fullyParallel: true,
  forbidOnly: !!process.env.CI,
  retries: process.env.CI ? 2 : 0,
  workers: process.env.CI ? 1 : undefined,
  reporter: 'html',
  use: {
    baseURL: 'http://localhost:3000',
    trace: 'on-first-retry',
  },

  /* Configure projects for major browsers */
  projects: [
    {
      name: 'chromium',
      use: { ...devices['Desktop Chrome'] },
    },
  ],

  webServer: {
    command: 'npm run start',
    url: 'http://localhost:3000',
    reuseExistingServer: !process.env.CI,
  },
});Next create a test file for writing E2E test code:
tests
├── e2e
│   ├── age-predictor.spec.ts      # 👈 E2E test for Age Predictor flow
├── integration
│   ├── agePredictorForm.test.tsx
├── unit
│   └── agePredictionResult.test.tsx
Before writing the code, let’s outline the steps we want to test for the Age Predictor:
test('Age Predictor home page functionality', async ({ page }) => {
  await page.goto('/');

  await expect(page.getByText('Estimate the Age of a Name')).toBeVisible();

  const input = page.getByPlaceholder('Enter your name');
  const button = page.getByText('Predict');

  await input.fill('John');
  await button.click();

  await expect(page.getByText(/Predicted age for John: \d+/)).toBeVisible();
});
Here’s what’s happening:
To make running E2E tests easier, add a script to your package.json:
"scripts": {
"dev": "next dev",
"build": "next build",
"start": "next start",
"test": "vitest",
"test:e2e": "playwright test" // 👈 add this command
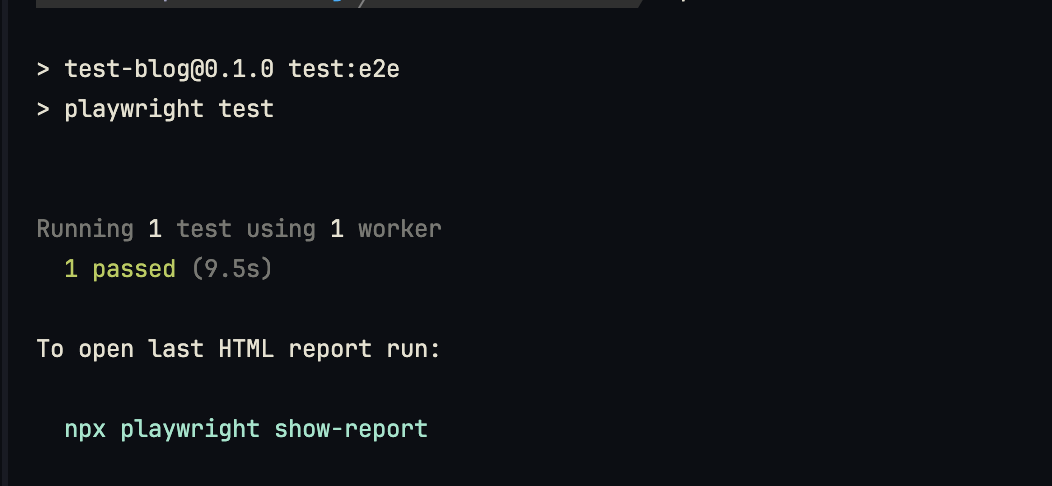
},Now run your E2E test with:
npm run test:e2eYou should see output showing which tests passed, and an HTML report will also be generated. At this point, the tests are running in headless mode (without opening a visible browser).
If you want to see the test running in real time, you can turn off headless mode. Open playwright.config.ts and add headless: false inside the use block:
use: {
  baseURL: "http://localhost:3000",
  trace: "on-first-retry",
  headless: false, // 👈 run tests in a visible browser
},
Then run the test again:
npm run test:e2eNow the browser will open, and you can watch your test interact with the page, it’s a fun way to see exactly how Playwright simulates user actions.
By now, you’ve seen how to:
Testing might feel extra at first, especially on small projects, but once you start building larger apps, it becomes your strong weapon for reliable, maintainable code. Plus, knowing testing well is a skill that top companies actually look for Apple, Google, Netflix… they all test like pros!
If you enjoyed this crash course and want to level up your Next.js and Next.js testing skills even further, you can explore all our courses, covering Next.js, React, backend, testing, and more, all in one place:
Testing is just the beginning. Keep building, keep testing, and keep mastering!

