The Ultimate Guide to Mastering Three.js for 3D Development
Loading...
Loading...

Join JS Mastery Pro to apply what you learned today through real-world builds, weekly challenges, and a community of developers working toward the same goal.
Welcome to our cheat sheet! This guide provides a quick reference to the fundamental concepts and techniques used in Three.js, a powerful JavaScript library for creating and in the browser.
Whether you're a beginner or an experienced dev, this cheat sheet is designed to help you quickly find and use the most commonly used Three.js features.
In this cheat sheet, you'll find code snippets and examples for setting up a , creating and manipulating , adding and , using , and more.
So, whether you're building a , a , or just experimenting with Three.js, this cheat sheet is a valuable resource to have. Let’s start...
Three.js is a powerful, open-source library for creating stunning on the web. It provides developers with an easy-to-use set of tools and utilities for building interactive, animated that can be rendered in any modern web browser.
With Three.js, developers can create a wide range of and scenes, including complex geometries, dynamic particle systems, and realistic and .
Whether you're building a game, a data visualization, or an interactive product demo, Three.js offers the flexibility and power you need to bring your ideas to life.
One of the key benefits of Three.js is its broad compatibility with different web technologies and frameworks, including , , and .
This means that you can easily integrate Three.js into your existing web projects or start from scratch with a new project, using familiar web development tools and techniques.
With a vibrant and supportive community of developers and designers, Three.js is constantly evolving and improving, making it an exciting and dynamic technology to explore and work with.
Whether you're a seasoned or just starting out, It offers a world of creative possibilities for building stunning, interactive web experiences.
Before we get started let's try to give you an idea of the structure of a three.js app.
A three.js app requires you to create a bunch of objects and connect them together. Here's a diagram that represents a small three.js app
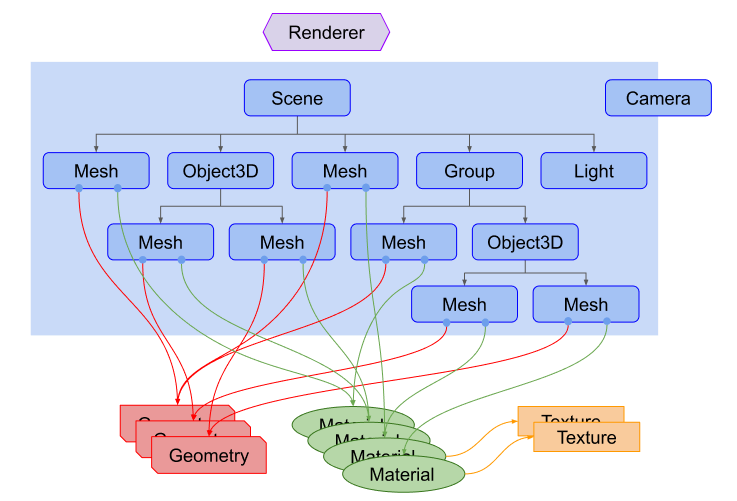
Things to notice about the diagram above.
There is a Renderer. This is arguably the main object of Three.js. You pass a Scene and a Camera to a Renderer and it renders (draws) the portion of the 3D scene that is inside the frustum of the camera as a 2D image to a canvas.
That was quite difficult, don't you think?
Let me break it down for you in simpler terms with a brief explanation or introduction of each term.
A renderer is responsible for drawing the 3D scene onto the web page. In Three.js, the class is used to create a renderer.
It uses , a graphics API based on OpenGL ES, to interact with the GPU and draw the scene onto the web page.
Geometry defines the shape and structure of an object in Three.js.
It is made up of (points in 3D space) and (triangles that connect the vertices).
Three.js provides a number of built-in geometries, such as , , and , as well as the ability to create custom geometries.
Lighting is used to simulate the way light interacts with objects in the scene. In Three.js, are used to illuminate the scene and create shadows.
Three.js provides a number of built-in lights, such as , , and , as well as the ability to create custom lights.
A camera determines the perspective and position of the viewer in the scene.
The and classes are used to create cameras.
The simulates a perspective view, while the simulates an isometric view.
Material defines how an object appears in the scene, including its color, texture, and shading. The materials are applied to to define their appearance.
It provides a number of built-in materials, such as , , and , as well as the ability to create custom materials using shaders.
A scene is the container that holds all of the objects, lights, and cameras in Three.js.
In order to render anything in Three.js, you must create a scene and add objects, lights, and cameras to it.
A texture is an image applied to a in Three.js.
Textures can be used to add detail to an object's surface, such as a wood grain pattern or a marble texture.
In Three.js, textures are loaded using the class and applied to materials using the property.
Animation is the process of creating movement or change in a 3D scene over time.
In Three.js, the animation is achieved using the method to update the position, rotation, or scale of objects in the scene.
In summary, Three.js provides a number of powerful tools for creating & rendering 3D graphics on the web.
By understanding the basics of concepts such as , , , , , , , and , you can begin creating your own 3D scenes and exploring more advanced features in Three.js.
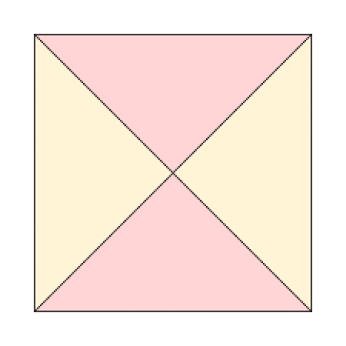
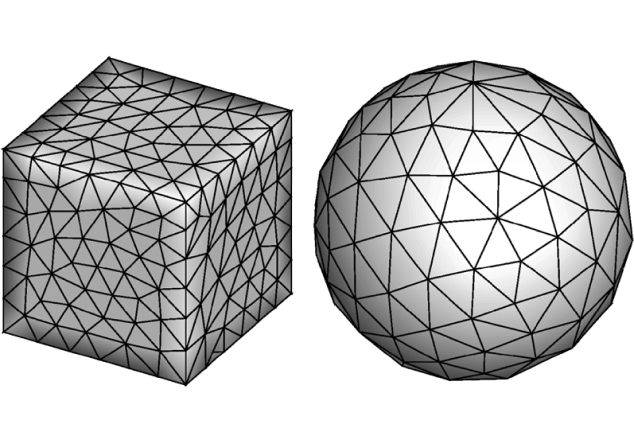
Everything in the 3D world is made of . A cube might seem like it’s made up of squares, but in most 3D graphics systems (including Three.js), even squares are represented using triangles.
The complexity of the shapes comes from the sheer number of triangles involved. It’s common for objects to be made up of millions of triangles, and in high-end visual effects or AAA movies, intricate scenes can involve billions.
In some cases, the triangles are even smaller than a .
But why triangles? Why not squares or circles?
The reason is simple: triangles are the most efficient and unambiguous way to represent a surface in 3D space. They can be seamlessly connected edge to edge without gaps or overlaps, making them ideal for creating complex models.
While simple in form, triangles are versatile enough to represent any shape.
In 3D graphics, a triangle is defined by three points, each with an coordinate.
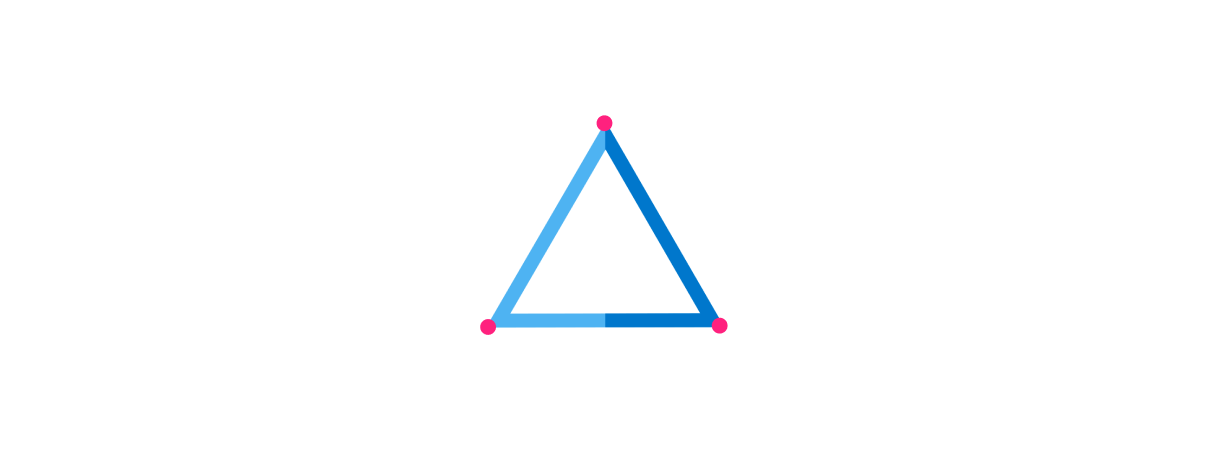
The order of these points determines the of the triangle, indicating which side is the outer, or front-facing, side of the surface. This orientation is often referred to as the surface's .
Lighting and shading effects in 3D models also rely on triangles. By calculating how light interacts with the surface of each triangle, the computer can create realistic lighting, shadows, and textures.
This process is called , where the 3D scene is converted into a 2D image that displays the final result on your screen.
Furthermore, modern , like GPUs, is optimized to handle triangles efficiently.
GPUs are designed to process large numbers of triangles in parallel, making them ideal for rendering real-time 3D environments, such as those found in or .
Triangles are also central to techniques like , where a 2D image is wrapped around a 3D model, and , which simulates small surface details.
In animation, the position and orientation of triangles can change frame by frame, creating movement. A process called "rigging " attaches a skeleton to the model, vertices of the triangles follow the movement of the skeleton to create realistic animation.
Ultimately, triangles are fundamental not just because of their geometric properties but also because of their efficiency in .
Without them, the rich, detailed 3D environments seen in today’s , , and would not be possible.
represents overall environmental illumination that comes from all directions, simulating indirect or bounced light in a scene. It uniformly lights all objects in the scene without any specific direction.
Ambient light helps to brighten dark areas and adds global illumination to the scene. You can create an ambient light using the class.
mimics the light emitted by a distant light source, such as the sun. It emits light rays in parallel directions, casting parallel shadows and creating realistic daylight simulations.
Directional lights have a position but no attenuation, and their intensity decreases with distance. You can create this light using the class.
represents a light source that emits light in all directions from a single point in space, creating omnidirectional illumination.
Point lights are useful for simulating light bulbs, lamps, or localized light sources. They cast shadows and attenuate with distance, becoming weaker as the distance from the light source increases. You can create a point light using the class.
simulates a focused beam of light emitted from a specific point in space in a cone-shaped direction. It casts shadows and can be used to create effects like flashlight beams or spotlight effects.
Spotlights have properties such as position, direction, and cone angle. You can create a spot light using the class.
The is the most commonly used camera in Three.js. It mimics the way human vision works, with objects appearing smaller as they move further away from the camera.
It's ideal for creating scenes with depth & perspective, such as 3D environments or architectural renderings.
Unlike the , the maintains the size of objects regardless of their distance from the camera.
It's useful for creating 2D-like scenes or when precise measurements are required, such as in CAD applications or 2D games.
Both and take parameters defining the view frustum, which determines what is visible in the scene.
These parameters include the
You can set the position and orientation of the camera using its and methods.
The method makes the camera point towards a specific point in the scene.
Three.js provides camera control libraries like or , which allow users to interactively control the camera's position and orientation using mouse or touch inputs.
These controls make it easier to navigate and explore 3D scenes.
const controls = new THREE.OrbitControls(camera, renderer.domElement);
controls.enableDamping = true; // Smoothly interpolate camera movement
By understanding these aspects of cameras in Three.js, you can effectively set up and control the viewpoint of your 3D scenes to achieve the desired perspective and interactivity.
In Three.js, geometries serve as the building blocks for creating 3D objects. Geometries define the shape and structure of objects in a 3D scene by specifying their vertices, faces, and other attributes.
Here's a breakdown of geometries in Three.js:
Three.js provides a set of built-in basic geometries that you can use to create common shapes such as cubes, spheres, cylinders, planes, and toruses.
These geometries are accessible through constructors like , , , , and .
Creates a cube-shaped geometry with specified width, height, and depth.
Generates a spherical geometry with a specified radius and number of segments for smoothness.
Constructs a cylindrical geometry with specified radii, height, and segments for detail.
Represents a flat, rectangular plane with specified width and height.
Creates a torus-shaped geometry (doughnut) with specified radius, tube radius, and segments for detail.
In addition to basic geometries, you can create by defining the and manually. This allows you to create more complex shapes and structures that are not provided by the built-in geometries.
In Three.js, a defines the visual appearance of 3D objects in a scene. It determines how interacts with the surface of an object, including aspects such as , , and .
Materials play a crucial role in rendering realistic and visually appealing graphics by simulating various surface properties and lighting effects.
Essentially, a defines how an object looks when rendered in a 3D scene.
This material provides simple shading unaffected by , suitable for objects with uniform colors or basic textures. It's commonly used for objects or those requiring .
You might use for creating wireframe objects or objects with .
Implements Phong shading, simulating smooth surfaces and highlights. Ideal for surfaces interacting with , such as shiny or reflective objects, like or .
You could use MeshPhongMaterial for creating objects like , , or glossy surfaces that exhibit specular highlights and reflections.
Employs physically-based rendering (PBR) for realistic materials. Suitable for a wide range of materials including , , and rough surfaces, providing a more realistic look.
You might use for creating objects in scenes where accurate material properties and lighting interactions are essential, such as architectural visualizations or product renderings.
is a library that simplifies building 3D applications with and . It provides a declarative and component-based approach to building and managing 3D scenes.
By using React Three Fiber, developers can use familiar React patterns to build and maintain complex 3D applications with less code and fewer bugs.
The library also provides performance optimizations that ensure smooth performance, even with complex scenes.
React Three Fiber's declarative and component-based approach can make it easier to reason about and manage the state and lifecycle of 3D objects in the scene, resulting in a more maintainable and scalable codebase.
Here's an example of what your file might look like →
import React from 'react';
import { Canvas } from 'react-three-fiber';
import { Box } from 'three';

function App() {
  return (
    <Canvas>
      <ambientLight />
      <pointLight position={[10, 10, 10]} />
      <Box>
        <meshStandardMaterial attach="material" color="hotpink" />
      </Box>
    </Canvas>
  );
}

export default App;
This sets up a basic scene with and , and a in the center of the scene.
import * as THREE from 'three';
import React, { useRef, useEffect } from 'react';
import { Canvas } from 'react-three-fiber';function App() {
return (
<Canvas>
<MyComponent />
</Canvas>
);
}function MyComponent() {
const meshRef = useRef();
useEffect(() => {
meshRef.current.rotation.x += 0.01;
meshRef.current.rotation.y += 0.01;
}
});
}, []);
return (
<mesh ref={meshRef}>
<boxBufferGeometry />
<meshStandardMaterial />
</mesh>
);
}
export default MyComponent;import { useThree, useFrame } from 'react-three-fiber';
function MyComponent() {
const meshRef = useRef();
const { mouse } = useThree();
useFrame(() => {
meshRef.current.rotation.x = mouse.y * Math.PI;
meshRef.current.rotation.y = mouse.x * Math.PI;
});
return (
<mesh ref={meshRef}>
<boxBufferGeometry />
<meshStandardMaterial />
</mesh>
);
}
export default MyComponent;import { useLoader } from 'react-three-fiber';
import { GLTFLoader } from 'three/examples/jsm/loaders/GLTFLoader';
function MyComponent() {
const gltf = useLoader(GLTFLoader, 'model.glb');
return (
<primitive object={gltf.scene} />
);
}
export default MyComponent;An example of a challenging aspect of building a 3D application with pure is managing the state and lifecycle of 3D objects in the scene.
Three.js provides a lot of low-level control over the 3D objects in the scene, such as the ability to add, remove, and update objects individually, but this can quickly become complex and hard to manage as the scene grows in complexity.
For example, imagine a 3D product website that allows users to customize and interact with a 3D model of a product.
The model may have multiple parts, each with its own material and texture, and the user may be able to change the color or texture of each part.
was built to address this and other challenges by providing a declarative and component-based approach to building 3D apps.
With , developers can use familiar patterns to manage the state and lifecycle of 3D objects in the scene, making it easier to build and maintain complex 3D applications.
Here's an example of how managing state in can become complex and how simplifies the process:
Let's say we want to create a 3D cube that changes color when clicked on. Here's how we might do it in pure :
// Create a scene, camera, and renderer
const scene = new THREE.Scene();
const camera = new THREE.PerspectiveCamera(
  75,
  window.innerWidth / window.innerHeight,
  0.1,
  1000
);
const renderer = new THREE.WebGLRenderer();
renderer.setSize(window.innerWidth, window.innerHeight);
document.body.appendChild(renderer.domElement);

// Create a cube with a random color
const geometry = new THREE.BoxGeometry();
const material = new THREE.MeshBasicMaterial({
  color: Math.random() * 0xffffff
});
const cube = new THREE.Mesh(geometry, material);
scene.add(cube);

// Add a click event listener to the cube to change its color
cube.addEventListener('click', () => {
  cube.material.color.setHex(Math.random() * 0xffffff);
});

// Render the scene
function animate() {
  requestAnimationFrame(animate);
  renderer.render(scene, camera);
}

animate();However, as the scene grows in complexity and more objects are added, managing the state and lifecycle of these objects can become challenging.
Here's how we could accomplish the same thing with :
import { useState } from 'react';
import * as THREE from 'three';

function Cube(props) {
  const { color, ...rest } = props;
  const [cubeColor, setCubeColor] = useState(color);

  const handleClick = () => {
    setCubeColor(Math.random() * 0xffffff);
  };

  return (
    <mesh {...rest} onClick={handleClick}>
      <boxGeometry />
      <meshBasicMaterial color={cubeColor} />
    </mesh>
  );
}

function Scene() {
  return (
    <Canvas>
      <Cube position={[-1, 0, 0]} color={Math.random() * 0xffffff} />
      <Cube position={[1, 0, 0]} color={Math.random() * 0xffffff} />
    </Canvas>
  );
}

function App() {
  return <Scene />;
}
In this code, we define a component that manages its own state using the hook.
The Cube component renders a Three.js mesh and material, and responds to click events to change its own color.
We then use the component twice in the component to create two cubes with different positions and random colors.
By using React Three Fiber's declarative and component-based approach, we can easily manage the state & lifecycle of multiple 3D objects in the scene.
React Three Fiber uses a to define 3D scenes, which can make it easier to reason about and maintain the codebase over time. This is because the code describes , rather than .
React Three Fiber uses a syntax that is similar to that of , which makes it easier for developers who are familiar with React to learn and use Three.js.
It uses React's , which can make it easier to organize and manage the state and lifecycle of 3D objects in a scene.
React Three Fiber is and lifecycle methods, which means that it can be used in large, complex applications without any performance issues.
It provides such as a helpful error message and a built-in inspector, which can make it easier to identify and fix issues in the 3D scene.
React Three Fiber has excellent , which means that you can write type-safe Three.js code in React.
React Three Fiber's makes it easy to manipulate Three.js objects, animate them, and add event listeners to them.
is a collection of useful Three.js components and helpers that are built on top of React Three Fiber. Drei components make it easy to create things like 3D text, post-processing effects, and particle systems.
Overall, React Three Fiber offers a more and way to work with Three.js in React, and is a great choice for developers who want to build 3D applications in React.
A component that creates a and mounts it to the DOM.
A component that wraps a and its .
A component that creates a Three.js , like a box or sphere.
A component that allows you to together for easier manipulation.
A hook that , like textures or 3D models.
A hook that runs on , allowing you to update Three.js objects over time.
Convenience hook that creates a from any Object 3D.
A component that adds to your Three.js scene.
A component that defines a for your scene.
Here's an example of using some of these features together to create a rotating cube:
import React, { useRef } from 'react';
import { Canvas, useFrame } from 'react-three-fiber';
import { Box } from '@react-three/drei';

function RotatingCube() {
  const meshRef = useRef();

  useFrame(() => {
      meshRef.current.rotation.x += 0.01;
      meshRef.current.rotation.y += 0.01;
  });

  return (
    <Box ref={meshRef}>
      <meshStandardMaterial attach="material" color="hotpink" />
    </Box>
  );
}

function App() {
  return (
    <Canvas>
      <ambientLight />
      <pointLight position={[10, 10, 10]} />
      <RotatingCube />
    </Canvas>
  );
}

export default App;
This creates a <Canvas> with , and a <RotatingCube> component that uses to rotate the cube on every frame.
The cube is created using the <Box> primitive, and its reference is stored in . Finally, the <Box> is wrapped in a <mesh> with a .
React Three Drei is a collection of useful helper components and hooks for building 3D applications with .
It is built on top of React Three Fiber and provides a higher-level API for common 3D tasks such as , , and .
React Three Drei offers a variety of pre-built components such as , , , , , , and that can be easily used in a React Three Fiber scene.
These components can help streamline the process of building 3D applications by abstracting away low-level Three.js code and providing a simpler and more intuitive interface.
React Three Drei also includes a number of hooks, such as , , and , that make it easier to work with assets in a 3D scene.
Overall, can help developers save time and effort when building 3D applications by providing pre-built components and hooks that abstract away low-level Three.js code and simplify common 3D tasks.
Here are some code examples of components and hooks →
import React, { useRef } from 'react';
import { Canvas } from 'react-three-fiber';
import { OrbitControls } from '@react-three/drei';

function App() {
  const cameraRef = useRef();

  return (
    <Canvas>
      <OrbitControls ref={cameraRef} />
      <mesh>
        <boxBufferGeometry />
        <meshStandardMaterial />
      </mesh>
    </Canvas>
  );
}

export default App;
This code creates a simple 3D scene with a and an component for controlling the camera position and rotation.
The component is imported from (short for "three"), which is a part of .
import React from 'react';
import { useTexture } from '@react-three/drei';

function App() {
  const texture = useTexture('/path/to/texture.jpg');

  return (
    <mesh>
      <boxBufferGeometry />
      <meshStandardMaterial map={texture} />
    </mesh>
  );
}

export default App;
This code uses the hook from to load a texture image and apply it to a mesh material.
The hook returns a object, which can be used as the property of a mesh material.
import React from 'react';
import { Html } from '@react-three/drei';

function App() {
  return (
    <Html>
      <div style={{ color: 'white' }}>Hello, world!</div>
    </Html>
  );
}

export default App;
This code uses the component from to render an HTML element in the 3D scene.
The component creates a separate HTML layer that is rendered on top of the 3D scene, allowing developers to easily create interactive and dynamic user interfaces in their 3D applications.
These are just a few examples of the many components and hooks provided by React Three Drei.
By using these pre-built components and hooks, developers can simplify common 3D tasks and create more complex 3D applications with less code.
provides a higher-level API for common 3D tasks, making it easier and faster to build 3D scenes compared to writing raw Three.js code.
Drei leverages , which helps organize and manage the state and lifecycle of 3D objects in a scene.
includes performance optimizations such as automatic batching of meshes and pre-loading of assets, improving the overall performance of 3D applications.
simplifies working with Three.js by offering a more familiar and developer-friendly syntax, especially for developers already familiar with React.
enhances and reduces complexity over pure Three.js, making it easier to maintain and scale projects.
Overall, streamlines the process of building 3D applications with Three.js by providing a simpler, more intuitive interface, performance optimizations, and a component-based architecture.
The main component that renders a Three.js scene in a React app.
A pre-built camera controller that allows users to pan, zoom, and orbit around the 3D scene.
A component that allows you to render HTML elements in a Three.js scene.
A component that allows you to render 3D text in a Three.js scene.
A component that creates a 3D line mesh.
A component that creates a 3D box mesh.
A component that creates a 3D sphere mesh.
A component that creates a 3D plane mesh.
A hook that loads a texture and returns a Three.js texture object.
A hook that loads a GLTF model and returns a Three.js object.
These are just a few examples of the many components and hooks available in .
The library provides a wide range of and that can simplify common 3D tasks and save developers time and effort.
Create a 3D cube using Three.js and experiment with different materials, textures, and lighting effects to make it visually appealing.
Build a model of the solar system using Three.js and explore the different planets, moons, and other celestial bodies in a 3D environment.
Create 3D text using Three.js and experiment with different fonts, sizes, and colors to make it visually interesting.
Build an interactive gallery using Three.js that allows users to navigate through different 3D objects or images.
Create particle effects using Three.js and experiment with different settings to make visually appealing effects, such as explosions, fire, or rain.
Create a 3D terrain using Three.js and experiment with different textures, heights, and shapes to create a dynamic landscape.
Build a 3D maze using Three.js and add interactive elements such as obstacles and rewards to make it more challenging and engaging.
Create a simple card-flipping animation using Three.js to showcase your understanding of basic 3D transformations and animations.
Build a 3D dice that users can roll and interact with using Three.js, using basic geometry and materials to create a realistic effect.
Build a virtual art gallery where users can walk around and explore various artworks in a 3D environment. Add interactivity such as information about each artwork upon clicking.
Create immersive visualizations of complex data sets using Three.js. This could include anything from financial data to scientific data, presented in a visually appealing and interactive 3D format.
Develop virtual tours of real-world locations or fictional environments using Three.js and WebVR. Users can explore these environments using VR headsets or simply their web browsers.
Build simple to complex 3D games such as puzzles, platformers, or first-person shooters using Three.js. You can incorporate physics engines like Ammo.js for realistic interactions.
Experiment with particle systems in Three.js to create mesmerizing effects like fire, smoke, water, or dynamic particle-based animations.
Develop interactive educational simulations for subjects like physics, chemistry, or biology. For example, you could create a simulation demonstrating gravitational forces or molecular structures.
Generate dynamic visualizations that respond to music or sound input. This could involve creating abstract visualizations that pulse and change based on the rhythm and intensity of the audio.
Combine 3D graphics with storytelling elements to create immersive interactive narratives. Users can navigate through the story world, interact with characters, and make choices that affect the outcome.
Develop interactive educational simulations for subjects like physics, chemistry, or biology. For example, you could create a simulation demonstrating gravitational forces or molecular structures.
Develop a 3D simulation of outer space where users can explore planets, moons, and other celestial bodies. Incorporate real astronomical data for accuracy and educational value.
Create a dynamic 3D visualization of weather patterns and phenomena such as clouds, rainfall, and storms. Users can interact with the simulation to understand weather dynamics.
Implement a fractal explorer that allows users to navigate and interact with 3D fractal structures in real-time. Fractals are visually stunning and provide endless exploration possibilities.
Develop interactive 3D visualizations of human anatomy or medical procedures. This could be used for educational purposes or to simulate surgical scenarios for training purposes.
Create a time-traveling experience where users can explore historical or futuristic environments. They can witness historical events or futuristic cities in 3D.
Design a city-building simulation where users can construct and manage their own virtual cities. Incorporate elements like zoning, infrastructure development, and economic simulation.
Build a simulator for controlling a robotic arm in 3D space. Users can manipulate the arm's movements and interact with objects in the environment, simulating real-world robotics applications.
Let your imagination run wild by creating a fantasy world with mythical creatures, magical landscapes, and epic battles. Users can explore this world and uncover its secrets.
Develop a game that helps users learn new languages through immersive 3D environments. Players can navigate through different scenarios and practice language skills in context.
Develop interactive infographics that use to animate data visualizations, charts, and diagrams. Add user interactions such as hover effects or click-triggered animations to enhance engagement.
Design an animated product showcase or portfolio website using to highlight key features and details of products or projects. Incorporate smooth transitions and interactive elements to engage visitors.
Create a website with scroll-based animations powered by . Implement effects like parallax scrolling, fade-ins, and transitions triggered as the user scrolls down the page for a dynamic experience.
Explore character animation using to bring characters to life in web-based applications or games. Create animations for character movements, expressions, and interactions with the environment.
Build an interactive map with -powered animations to visualize data, highlight locations, and provide dynamic navigation features. Add animations for map markers, tooltips, and route paths.
Design animated logos or brand identities using to create memorable and visually engaging brand experiences. Experiment with different animation techniques such as morphing, scaling, and rotation.
You’ve completed . You now have the tools and knowledge to bring your 3D ideas to life, from the fundamentals to advanced techniques and exciting project ideas.
Keep practicing, experimenting, and pushing the boundaries of your creativity. Three.js offers endless possibilities, and the more you build, the more you'll discover its potential.
Happy coding, and enjoy creating immersive 3D experiences! 🌟🎮

