Next.js Tutorial & Guide for Beginners
Loading...
Loading...
React is incredible for building user interfaces, but when you want to build a complete application, you quickly realize it's just one piece of the puzzle. You'll need to add separate libraries for things like routing, data fetching, and performance optimization. It can get messy, and this is where Next.js comes in.
Next.js is a full-stack React framework that gives you all the essential tools you need to build a complete app, right out of the box. Think of it like a full-featured toolbox where all the tools are perfectly designed to work together.
In this guide, you'll learn key Next.js 15 concepts by building a simple real-world Stock Market Dashboard. You'll get hands-on experience with routing, components, server vs. client rendering, hooks and more. Let's get started!
If you're wondering why you can't just stick with plain React, that's a great question. Here’s the key difference in a nutshell:
Next.js 15 adds on top of React with powerful features like:
Instead of hunting for and configuring a dozen different libraries, Next.js gives you a cohesive, powerful solution from the start.
Let's create our project. The easiest way is using create-next-app, which sets up a new project with all the necessary files.
Open your terminal and run the following command:
npx create-next-app@latest stock-dashboard
When prompted, accept the default options by pressing Enter for each. This will set up a new Next.js 15 project with TypeScript and Tailwind CSS.
Once it's done, navigate into the new folder and start the development server:
cd stock-dashboardnpm run dev
Now, visit http://localhost:3000 in your browser. You should see the default Next.js welcome page. See how we didn’t have to configure Webpack, set up routing, or install Tailwind manually? Next.js handles all that for you.

The core of a Next.js app is the app/ directory. This is where your routes, pages, and shared layouts live. Here’s a quick breakdown of the key files and folders you’ll find in a standard Next.js project.
The following is a typical file structure you'll encounter when starting a new Next.js project.
stock-dashboard/├── app/ # App Router (routes, layouts, APIs)│ ├── favicon.ico # Default favicon│ ├── globals.css # Global styles + Tailwind directives│ ├── layout.tsx # Root layout (wraps all pages)│ └── page.tsx # Home page → /├── public/ # Static files served at /│ └── vercel.svg # Default Vercel logo├── node_modules/ # Installed dependencies├── package.json # Project dependencies & scripts├── tsconfig.json # TypeScript configuration├── next.config.js # Next.js configuration└── README.md # Project instructions
This structure allows us to organize our code in a clear, intuitive way, unlike traditional React apps that require a separate router setup.
Now that we have a grasp of the basic file structure, let’s update our project by adding three essential directories: components, hooks, and lib. These folders help us organize reusable UI, custom logic, and utility functions, respectively, making our codebase more modular and maintainable.
stock-dashboard/├── app/ # App Router (routes, layouts, APIs)│ ├── favicon.ico # Default favicon│ ├── globals.css # Global styles + Tailwind directives│ ├── layout.tsx # Root layout (wraps all pages)│ └── page.tsx # Home page → /├── public/ # Static files served at /│ └── vercel.svg # Default Vercel logo**├── components/ # Reusable React components├── hooks/ # Reusable custom React hooks├── lib/ # Utility functions and constants**├── node_modules/ # Installed dependencies├── package.json # Project dependencies & scripts├── tsconfig.json # TypeScript configuration├── next.config.js # Next.js configuration└── README.md # Project instructions
Next.js projects come pre-configured with Tailwind CSS, a utility-first CSS framework that makes styling fast and efficient. The app/globals.css file is where you can define styles that apply across your entire application.
By default, this file sets up some basic styling and a built-in dark mode. It uses CSS variables to manage colors, which is a great practice for maintainability.
To make our dashboard look polished, we'll add some custom colors and utility classes to globals.css. This is where you can define your brand's color palette and create reusable styles.
Open the /app/globals.css file.
Replace the content with the provided code. This new code adds specific color variables for the dashboard, as well as a few helper classes . /app/globals.css
@import "tailwindcss";:root {--background: #ffffff;--foreground: #171717;}@theme inline {--color-background: var(--background);--color-foreground: var(--foreground);--font-sans: var(--font-geist-sans);--font-mono: var(--font-geist-mono);}@media (prefers-color-scheme: dark) {:root {--background: #0a0a0a;--foreground: #ededed;}}/* === CUSTOM COLOR THEME === */@theme {--color-gray-900: #050505;--color-gray-400: #CCDADC;--color-teal-400: #0FEDBE;}@layer base {body {@apply bg-gray-900 text-foreground;}}@layer utilities {.container {@apply mx-auto max-w-screen-2xl px-4 md:px-6 lg:px-8;}.home-wrapper {@apply my-10 md:my-15 text-gray-400 flex-col gap-4 md:gap-10 items-center sm:items-start;}.home-section {@apply w-full gap-8 grid-cols-1 md:grid-cols-2 xl:grid-cols-3;}.stock-details-wrapper {@apply my-10 md:my-15 flex flex-col;}.stock-details-container {@apply mt-10 w-full grid-cols-1 gap-6 xl:grid-cols-3 space-y-6 sm:space-y-8;}}/* TradingView Advanced Chart Widget Styles */.tradingview-widget-container {position: relative;background-color: #141414 !important;border-radius: 8px !important;overflow: hidden !important;}.tradingview-widget-container__widget {background-color: #141414 !important;height: 100% !important;}
A component is a self-contained piece of UI, like a button, a card, or, in our case, a TradingView Widget. We'll create a component that can display different stock charts and data based on the settings we pass to it.
TradingView Widgets are pre-built, interactive financial charts we can embed directly into our application. They let us display live stock data without building a complex charting system from scratch, so we can focus on learning Next.js.
In Next.js, components can be rendered in two places:
Because we need to dynamically load an external script (TradingViewWidget) after the page loads, our component must run in the browser. We tell Next.js to do this by adding 'use client'; at the very top of the file.
Hooks are special functions that let you “hook into” React features like state, lifecycle events, or references to HTML elements. Here, we'll use them to dynamically load a script after the component renders. We need a hook to load the TradingView script safely in the browser because external scripts cannot run on the server in Next.js.
First, let's create a custom hook to handle the script loading logic.
Inside the folder called hooks, create useTradingViewWidget.ts and paste the provided code.
Code /hooks/useTradingViewWidget.ts
/* eslint-disable react-hooks/exhaustive-deps */'use client'; // tells Next.js this component runs in the browserimport { useEffect, useRef } from 'react';export function useTradingViewWidget(scriptUrl: string, config: Record<string, unknown>, height = 600) {const containerRef = useRef<HTMLDivElement | null>(null);useEffect(() => {if (!containerRef.current) return;if (containerRef.current.dataset.loaded) return; // prevents duplicate scripts// Create container div for the widgetcontainerRef.current.innerHTML = `<div class="tradingview-widget-container__widget" style="width: 100%; height: ${height}px;"></div>`;// Load TradingView scriptconst script = document.createElement('script');script.src = scriptUrl;script.async = true;script.innerHTML = JSON.stringify(config);containerRef.current.appendChild(script);containerRef.current.dataset.loaded = 'true';// Cleanup when component unmountsreturn () => {if (containerRef.current) {containerRef.current.innerHTML = '';delete containerRef.current.dataset.loaded;}};}, [scriptUrl, config, height]);return containerRef;}
This hook uses two key React hooks:
Now that we have a hook to load the script, let’s build the actual component that will display the chart.
Inside a folder called components, create TradingViewWidget.tsx and paste the provided code.
Code /components/TradingViewWidget.tsx
'use client';import { useTradingViewWidget } from '@/hooks/useTradingViewWidget';import React, { memo } from 'react';interface TradingViewWidgetProps {title?: string;scriptUrl: string;config: Record<string, unknown>;height?: number;}const TradingViewWidgetComponent = ({ title, scriptUrl, config, height = 600 }: TradingViewWidgetProps) => {const containerRef = useTradingViewWidget(scriptUrl, config, height);return (<div className="w-full">{title && <h3 className="font-semibold text-2xl text-gray-100 mb-5">{title}</h3>}<div className="tradingview-widget-container" ref={containerRef}><div className="tradingview-widget-container__widget" style={{ width: '100%', height }} /></div></div>);};export const TradingViewWidget = memo(TradingViewWidgetComponent);
TradingView scripts come with settings for symbols, colors, and tabs. Instead of putting all this inside the component, we store them separately in /lib/constants.ts. This keeps our code clean and maintainable.
Inside a folder called lib create constants.ts and paste the provided code.
Code /lib/constants.ts
export const STOCKS = [{ symbol: 'AAPL', name: 'Apple' },{ symbol: 'AMZN', name: 'Amazon' },{ symbol: 'MSFT', name: 'Microsoft' },{ symbol: 'GOOGL', name: 'Google' },{ symbol: 'META', name: 'Meta' },{ symbol: 'ORCL', name: 'Oracle' },{ symbol: 'NFLX', name: 'Netflix' },{ symbol: 'NVDA', name: 'Nvidia' },{ symbol: 'TSLA', name: 'Tesla' },];// TradingView Chartsexport const MARKET_OVERVIEW_WIDGET_CONFIG = {colorTheme: 'dark',dateRange: '12M',locale: 'en',largeChartUrl: '',isTransparent: true,showFloatingTooltip: true,plotLineColorGrowing: '#0FEDBE',plotLineColorFalling: '#0FEDBE',gridLineColor: 'rgba(240, 243, 250, 0)',scaleFontColor: '#DBDBDB',belowLineFillColorGrowing: 'rgba(41, 98, 255, 0.12)',belowLineFillColorFalling: 'rgba(41, 98, 255, 0.12)',belowLineFillColorGrowingBottom: 'rgba(41, 98, 255, 0)',belowLineFillColorFallingBottom: 'rgba(41, 98, 255, 0)',symbolActiveColor: 'rgba(15, 237, 190, 0.05)',tabs: [{title: 'Technology',symbols: [{ s: 'NASDAQ:AAPL', d: 'Apple' },{ s: 'NASDAQ:GOOGL', d: 'Alphabet' },{ s: 'NASDAQ:MSFT', d: 'Microsoft' },{ s: 'NASDAQ:FB', d: 'Meta Platforms' },{ s: 'NYSE:ORCL', d: 'Oracle Corp' },{ s: 'NASDAQ:INTC', d: 'Intel Corp' },],},{title: 'Financial',symbols: [{ s: 'NYSE:JPM', d: 'JPMorgan Chase' },{ s: 'NYSE:WFC', d: 'Wells Fargo Co New' },{ s: 'NYSE:BAC', d: 'Bank Amer Corp' },{ s: 'NYSE:HSBC', d: 'Hsbc Hldgs Plc' },{ s: 'NYSE:C', d: 'Citigroup Inc' },{ s: 'NYSE:MA', d: 'Mastercard Incorporated' },],},{title: 'Services',symbols: [{ s: 'NASDAQ:AMZN', d: 'Amazon' },{ s: 'NYSE:BABA', d: 'Alibaba Group Hldg Ltd' },{ s: 'NYSE:T', d: 'At&t Inc' },{ s: 'NYSE:WMT', d: 'Walmart' },{ s: 'NYSE:V', d: 'Visa' },],},],support_host: 'https://www.tradingview.com',backgroundColor: '#141414',width: '100%',height: 600,showSymbolLogo: true,showChart: true,};export const HEATMAP_WIDGET_CONFIG = {dataSource: 'SPX500',blockSize: 'market_cap_basic',blockColor: 'change',grouping: 'sector',isTransparent: true,locale: 'en',symbolUrl: '',colorTheme: 'dark',exchanges: [],hasTopBar: false,isDataSetEnabled: false,isZoomEnabled: true,hasSymbolTooltip: true,isMonoSize: false,width: '100%',height: '600',};export const TOP_STORIES_WIDGET_CONFIG = {displayMode: 'regular',feedMode: 'market',colorTheme: 'dark',isTransparent: true,locale: 'en',market: 'stock',width: '100%',height: '600',};export const MARKET_DATA_WIDGET_CONFIG = {title: 'Stocks',width: '100%',height: 600,locale: 'en',showSymbolLogo: true,colorTheme: 'dark',isTransparent: false,backgroundColor: '#0F0F0F',symbolsGroups: [{name: 'Financial',symbols: [{ name: 'NYSE:JPM', displayName: 'JPMorgan Chase' },{ name: 'NYSE:WFC', displayName: 'Wells Fargo Co New' },{ name: 'NYSE:BAC', displayName: 'Bank Amer Corp' },{ name: 'NYSE:HSBC', displayName: 'Hsbc Hldgs Plc' },{ name: 'NYSE:C', displayName: 'Citigroup Inc' },{ name: 'NYSE:MA', displayName: 'Mastercard Incorporated' },],},{name: 'Technology',symbols: [{ name: 'NASDAQ:AAPL', displayName: 'Apple' },{ name: 'NASDAQ:GOOGL', displayName: 'Alphabet' },{ name: 'NASDAQ:MSFT', displayName: 'Microsoft' },{ name: 'NASDAQ:FB', displayName: 'Meta Platforms' },{ name: 'NYSE:ORCL', displayName: 'Oracle Corp' },{ name: 'NASDAQ:INTC', displayName: 'Intel Corp' },],},{name: 'Services',symbols: [{ name: 'NASDAQ:AMZN', displayName: 'Amazon' },{ name: 'NYSE:BABA', displayName: 'Alibaba Group Hldg Ltd' },{ name: 'NYSE:T', displayName: 'At&t Inc' },{ name: 'NYSE:WMT', displayName: 'Walmart' },{ name: 'NYSE:V', displayName: 'Visa' },],},],};export const SYMBOL_INFO_WIDGET_CONFIG = (symbol: string) => ({symbol: symbol.toUpperCase(),colorTheme: 'dark',isTransparent: true,locale: 'en',width: '100%',height: 170,});export const CANDLE_CHART_WIDGET_CONFIG = (symbol: string) => ({allow_symbol_change: false,calendar: false,details: true,hide_side_toolbar: true,hide_top_toolbar: false,hide_legend: false,hide_volume: false,hotlist: false,interval: 'D',locale: 'en',save_image: false,style: 1,symbol: symbol.toUpperCase(),theme: 'dark',timezone: 'Etc/UTC',backgroundColor: '#141414',gridColor: '#141414',watchlist: [],withdateranges: false,compareSymbols: [],studies: [],width: '100%',height: 600,});export const BASELINE_WIDGET_CONFIG = (symbol: string) => ({allow_symbol_change: false,calendar: false,details: false,hide_side_toolbar: true,hide_top_toolbar: false,hide_legend: false,hide_volume: false,hotlist: false,interval: 'D',locale: 'en',save_image: false,style: 10,symbol: symbol.toUpperCase(),theme: 'dark',timezone: 'Etc/UTC',backgroundColor: '#141414',gridColor: '#141414',watchlist: [],withdateranges: false,compareSymbols: [],studies: [],width: '100%',height: 600,});export const TECHNICAL_ANALYSIS_WIDGET_CONFIG = (symbol: string) => ({symbol: symbol.toUpperCase(),colorTheme: 'dark',isTransparent: 'true',locale: 'en',width: '100%',height: 400,interval: '1h',largeChartUrl: '',});export const COMPANY_PROFILE_WIDGET_CONFIG = (symbol: string) => ({symbol: symbol.toUpperCase(),colorTheme: 'dark',isTransparent: 'true',locale: 'en',width: '100%',height: 440,});export const COMPANY_FINANCIALS_WIDGET_CONFIG = (symbol: string) => ({symbol: symbol.toUpperCase(),colorTheme: 'dark',isTransparent: 'true',locale: 'en',width: '100%',height: 532,displayMode: 'regular',largeChartUrl: '',});
This practice is called separation of concerns. Our component now only worries about displaying a chart, while our constants file handles the data and settings for each specific chart.
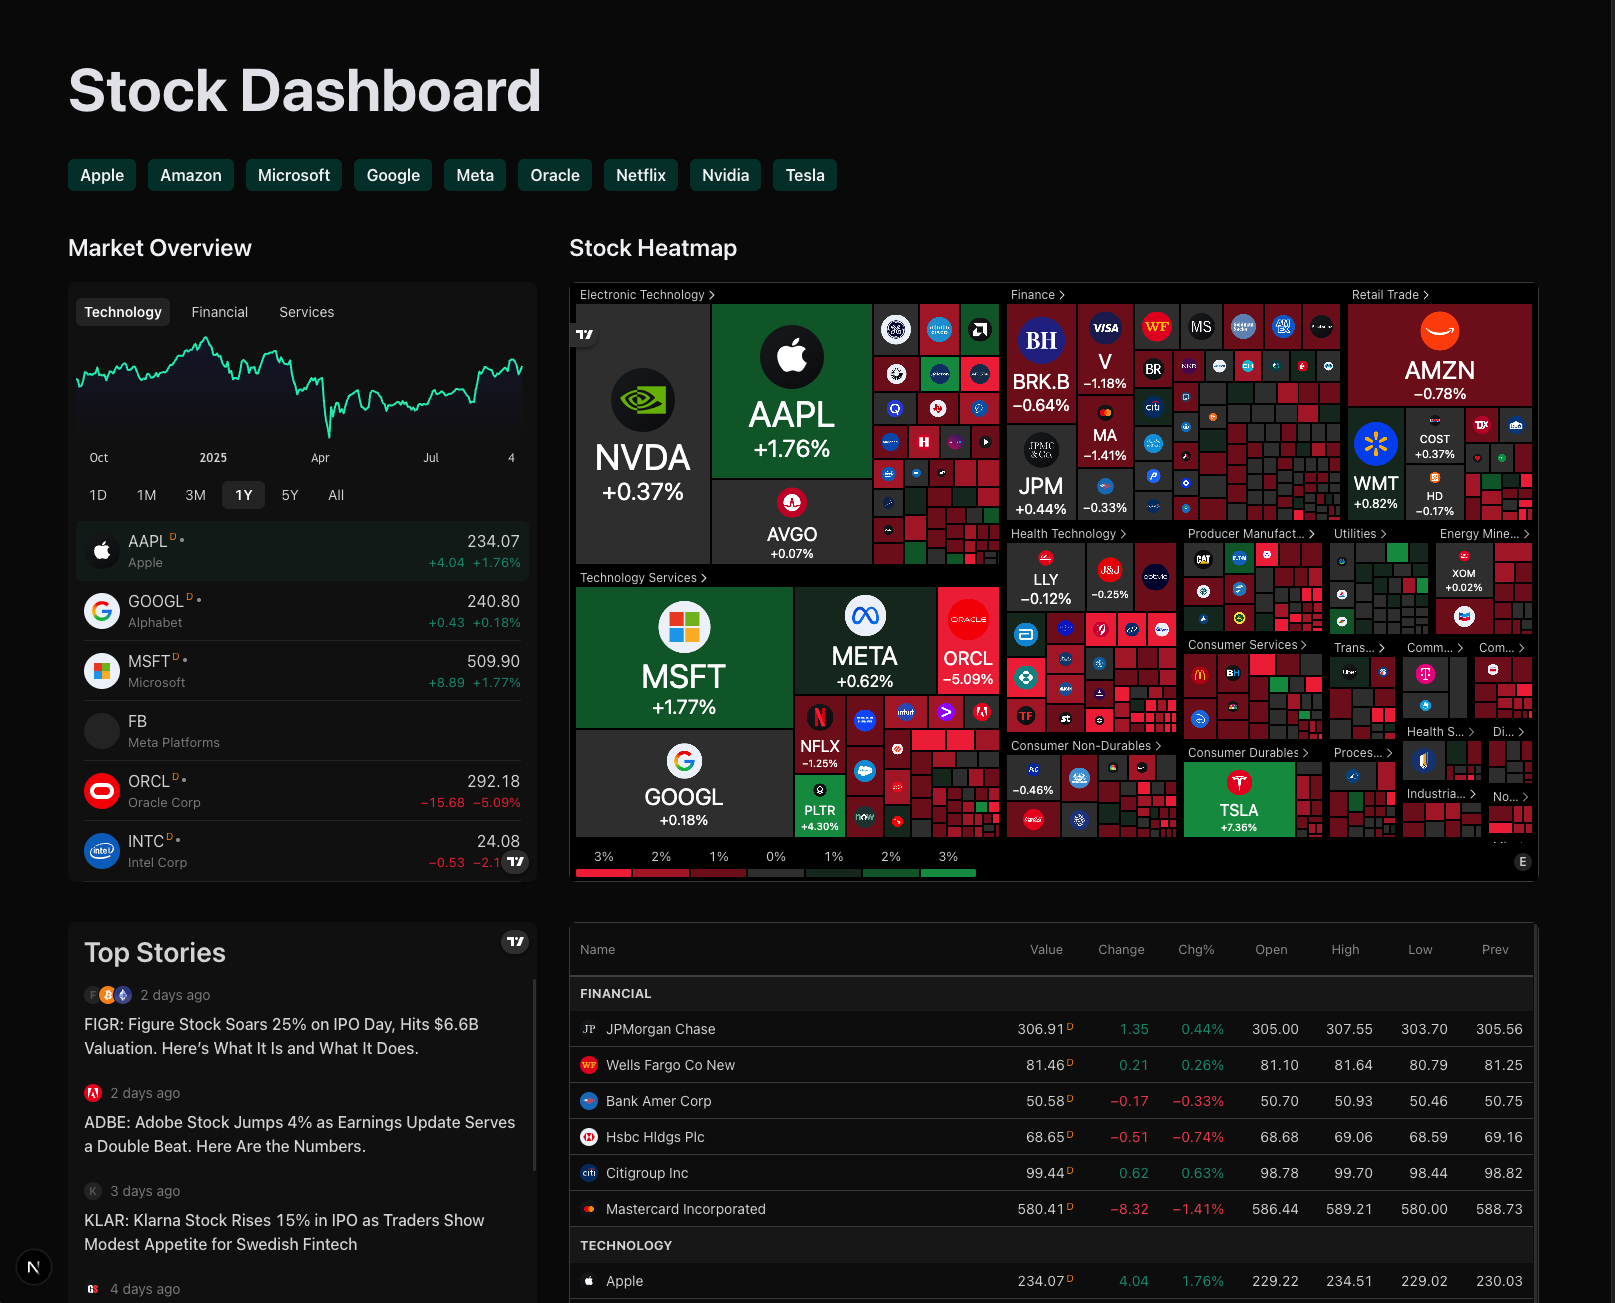
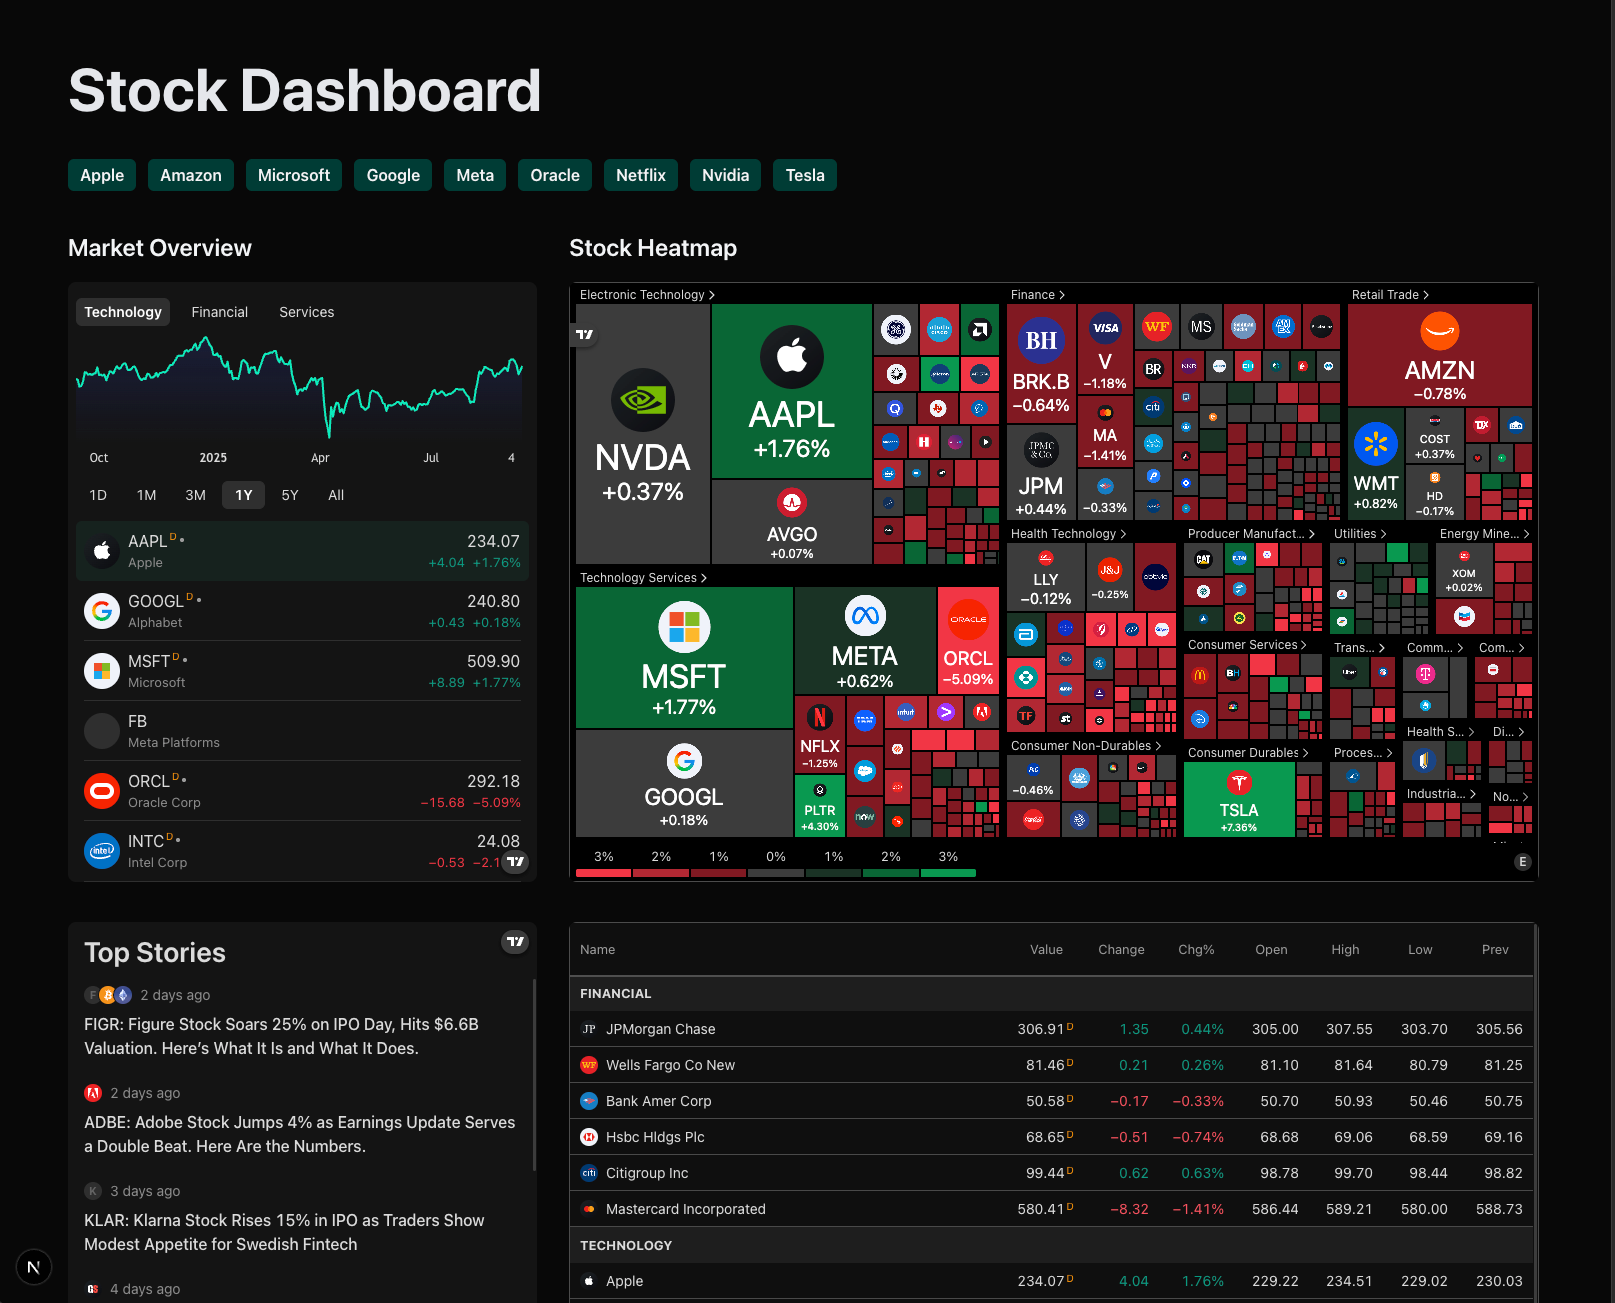
Now that we have our reusable TradingViewWidget component, we can assemble our dashboard on the home page. In Next.js, the home page is defined in app/page.tsx. This file will serve as the main entry point for our application's user interface.
Open app/page.tsx and replace the existing code with the following. This code imports our components and constants and uses Tailwind CSS to create the dashboard layout.
Code /app/page.tsx
import {HEATMAP_WIDGET_CONFIG,MARKET_DATA_WIDGET_CONFIG,MARKET_OVERVIEW_WIDGET_CONFIG,STOCKS,TOP_STORIES_WIDGET_CONFIG,} from '@/lib/constants';import Link from 'next/link';const Home = () => {return (<div className="flex min-h-screen home-wrapper"><h1 className="w-full font-bold text-gray-200 text-4xl md:text-5xl lg:text-6xl mb-5">Stock Dashboard</h1><ul className="flex gap-3 flex-wrap max-sm:mb-5">{STOCKS.map((stock) => (<li key={stock.symbol} className="bg-teal-500/25 text-center py-1 px-3 rounded-md"><Link href={`/stocks/${stock.symbol}`}><h2 className="font-semibold text-gray-100">{stock.name}</h2></Link></li>))}</ul><section className="grid w-full gap-8 home-section"><div className="md:col-span-1 xl:col-span-1"><TradingViewWidgettitle="Market Overview"scriptUrl="https://s3.tradingview.com/external-embedding/embed-widget-market-overview.js"config={MARKET_OVERVIEW_WIDGET_CONFIG}height={600}/></div><div className="md:col-span-1 xl:col-span-2"><TradingViewWidgettitle="Stock Heatmap"scriptUrl="https://s3.tradingview.com/external-embedding/embed-widget-stock-heatmap.js"config={HEATMAP_WIDGET_CONFIG}height={600}/></div></section><section className="grid w-full gap-8 home-section"><div className="md:col-span-1 xl:col-span-1"><TradingViewWidgetscriptUrl="https://s3.tradingview.com/external-embedding/embed-widget-timeline.js"config={TOP_STORIES_WIDGET_CONFIG}height={600}/></div><div className="md:col-span-1 xl:col-span-2"><TradingViewWidgetscriptUrl="https://s3.tradingview.com/external-embedding/embed-widget-market-quotes.js"config={MARKET_DATA_WIDGET_CONFIG}height={600}/></div></section></div>);};export default Home;
This code does a few things:
But notice we use the Link component from Next.js?
The Link component from Next.js is essential for client-side routing. Unlike a standard <a> tag, Link prefetches pages, making navigation instantaneous.
In our code, we use it to wrap each stock name:
<Link href={`/stocks/${stock.symbol}`}><h2 className="font-semibold text-gray-100">{stock.name}</h2></Link>
This dynamically creates a fast, client-side link for each stock, such as /stocks/AAPL
To ensure the page has proper spacing, open app/layout.tsx and add the container class to the <body> tag:
Code
import type { Metadata } from 'next';import { Geist, Geist_Mono } from 'next/font/google';import './globals.css';const geistSans = Geist({variable: '--font-geist-sans',subsets: ['latin'],});const geistMono = Geist_Mono({variable: '--font-geist-mono',subsets: ['latin'],});export const metadata: Metadata = {title: 'Stock Dashboard',description: 'A dashboard for tracking stock market data',};export default function RootLayout({children,}: Readonly<{children: React.ReactNode;}>) {return (<html lang="en"><body className={`${geistSans.variable} ${geistMono.variable} container antialiased`}>{children}</body></html>);}
After saving, visit home page at http://localhost:3000 . You should now be able to see our stocks dashboard!
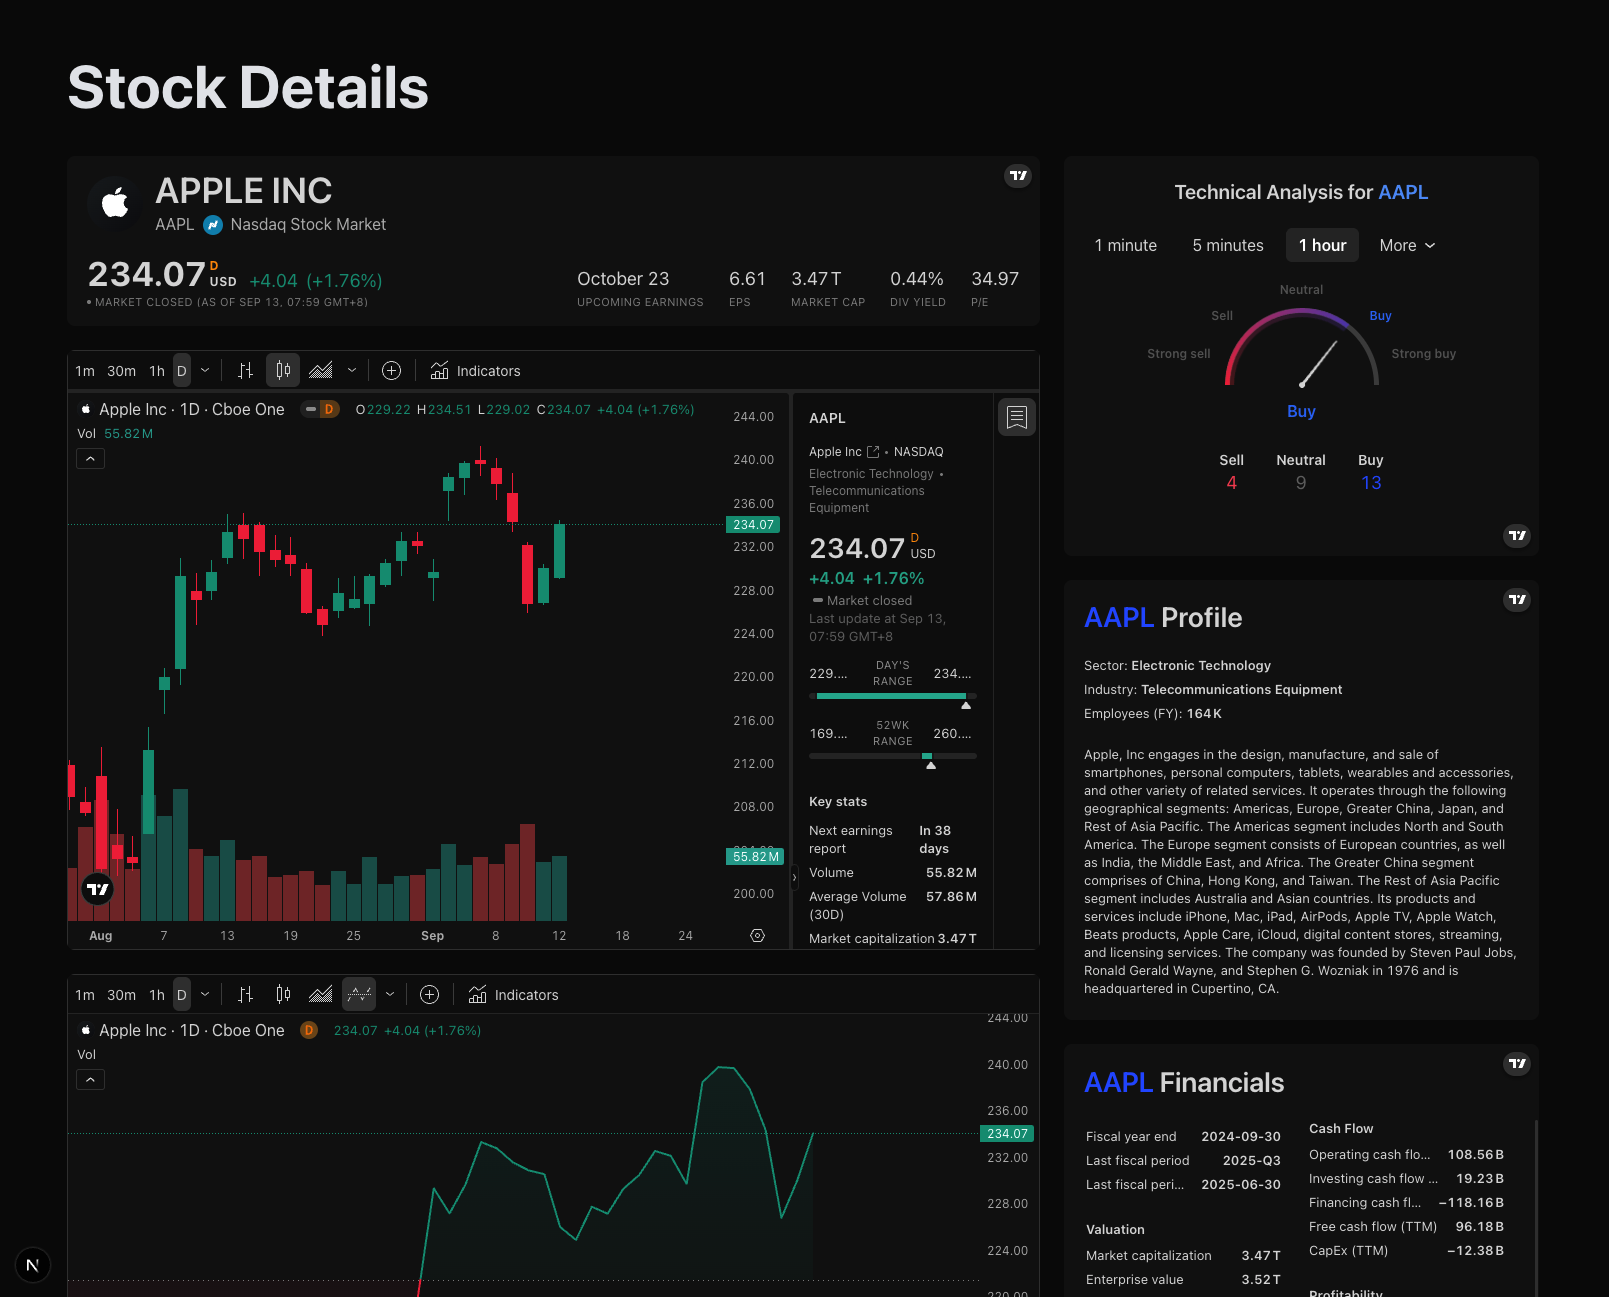
A dashboard is great, but what if a user wants to see detailed information for a single stock, like Apple (AAPL) or Microsoft (MSFT)? Instead of creating a separate page for every single stock, Next.js lets us use dynamic routes
A dynamic route uses a special syntax with brackets [param] to create a placeholder in the URL.
Create a new folder inside app/ called stocks.
Inside the stocks folder, create another folder called [symbol].
Inside [symbol], create a file named page.tsx and paste the provided code.
Code /app/stocks/[symbol]/page.tsx
import {BASELINE_WIDGET_CONFIG,CANDLE_CHART_WIDGET_CONFIG,COMPANY_FINANCIALS_WIDGET_CONFIG,COMPANY_PROFILE_WIDGET_CONFIG,SYMBOL_INFO_WIDGET_CONFIG,TECHNICAL_ANALYSIS_WIDGET_CONFIG,} from '@/lib/constants';interface StockDetailsPageProps {params: Promise<{symbol: string;}>;}const StockDetails = async ({ params }: StockDetailsPageProps) => {const { symbol } = await params;return (<div className="stock-details-wrapper"><h1 className="w-full font-bold text-gray-200 text-4xl md:text-5xl lg:text-6xl">Stock Details</h1><div className="grid stock-details-container"><section className="lg:col-span-2 flex flex-col gap-6">{/* Symbol Info */}<TradingViewWidgetscriptUrl="https://s3.tradingview.com/external-embedding/embed-widget-symbol-info.js"config={SYMBOL_INFO_WIDGET_CONFIG(symbol)}/>{/* Candle Chart */}<TradingViewWidgetscriptUrl="https://s3.tradingview.com/external-embedding/embed-widget-advanced-chart.js"config={CANDLE_CHART_WIDGET_CONFIG(symbol)}/>{/* Baseline Chart */}<TradingViewWidgetscriptUrl="https://s3.tradingview.com/external-embedding/embed-widget-advanced-chart.js"config={BASELINE_WIDGET_CONFIG(symbol)}/></section><section className="lg:col-span-1 flex flex-col gap-6 w-full">{/* Technical Analysis */}<TradingViewWidgetscriptUrl="https://s3.tradingview.com/external-embedding/embed-widget-technical-analysis.js"config={TECHNICAL_ANALYSIS_WIDGET_CONFIG(symbol)}/>{/* Company Profile */}<TradingViewWidgetscriptUrl="https://s3.tradingview.com/external-embedding/embed-widget-symbol-profile.js"config={COMPANY_PROFILE_WIDGET_CONFIG(symbol)}/>{/* Company Financials */}<TradingViewWidgetscriptUrl="https://s3.tradingview.com/external-embedding/embed-widget-financials.js"config={COMPANY_FINANCIALS_WIDGET_CONFIG(symbol)}/></section></div></div>);};export default StockDetails;
The page.tsx file inside [symbol] will now handle any URL that matches the pattern /stocks/[something]. The value of [symbol] is available in the params prop.
Congratulations! You've just built a simple but modern stock dashboard using some of the most important concepts in Next.js 15:
✅ Project Setup: Using create-next-app for a fast, zero-config start.
✅ App Router: Structuring your app with file-based routing.
✅ Rendering: Understanding the difference between Server Components and Client Components.
✅ Components: Creating reusable UI parts that can be easily customized with props.
✅ Dynamic Routes: Using [param] to create scalable pages for any stock without writing extra code.
This project is a solid foundation, but there's so much more you can do with Next.js.
If you want to take your skills further and build a fully-featured stock market app with advanced functionalities like:
…then check out our Stock Market YouTube tutorial, where I walk you through building a fully-featured stock market app step by step.
👉 Watch the full tutorial here
If you’re serious about leveling up, this course below is your complete roadmap. It covers everything from beginner foundations to advanced patterns. By the end of the course, you’ll confidently build apps that are fast, maintainable, and production-ready - the kind of skills top developers have!

Join JS Mastery Pro to apply what you learned today through real-world builds, weekly challenges, and a community of developers working toward the same goal.